Ad-Free Blog
Custom Tables
I've really been trying to use up some of the odds and ends I have around here. I've had a package of chopsticks on my table top for a few months---hmmmm, how about table legs?
Chris and Robb have moved into the Victorian Mansion---but Chris' esthetic is a bit more California modern. The bedrooms are small, and she really needs a quiet space to work at, so a custom desk is needed.
Intermediate Project (doable for ages 10 and up)
Tools needed:
Mitre or coping saw
Mitre box
Removable tape
Glue (I used E-6000 for this project and a gel super-glue)
Square for accurate measuring
pencil
Sanding block (I use the sponge type with multiple grits on the different sides)
Pliers to open the glue, LOL. (old hands)
brushes (1 for sealer, one for paint)
Materials:
3/8x 3/8" wood for braces.
4-5 chopsticks (depending on the design of your table
Basswood 1/4" thick and a piece-large enough for your table top.
clear brush on sealer
paint
(vinyl stickum paper) optional
First, determine the design of your table. I have two corner work tables in my workshop, and they are curved in the front and very comfortable to work at. The chair slides underneath and gives maximum walking space in the room.A similar design was perfect for the cramped bedroom in the Mansion. Doll furniture is often too low, so I decided to make my table legs 4". Getting legs to exact lengths is the hardest part.
My table was going to have 5 corners, so I needed that many legs. Aren't these twisted chopsticks cool. Anyway tape them together so the ends are even. Can't wait to use the other ends for some slick side modern tables.
Place the entire bundle in the mitre box and cut them all at once.
I only had one that slipped a bit.
Lightly sand them together, and if one is larger sand that one down. This was better than cutting them individually because 4 of the 5 are all the same.
Make a pattern piece of the shape of your desk, double check and fit it into your space. Then trace onto your flat wood. Curves are always interesting, and I use a hand coping saw to cut the curves, and the mitre box saw to cut the straights. Lightly sand all the edges and the corners.
Here you can see the curve on the table.
The Chopstick legs will need some extra support, so I cut some 3/8x3/8" stock into lengths to go around the table edge (the skirt). I left the curve open. These skirt pieces were super glued in place. Bare wood to bare wood glues nicely with super-glue, I use a gel type.
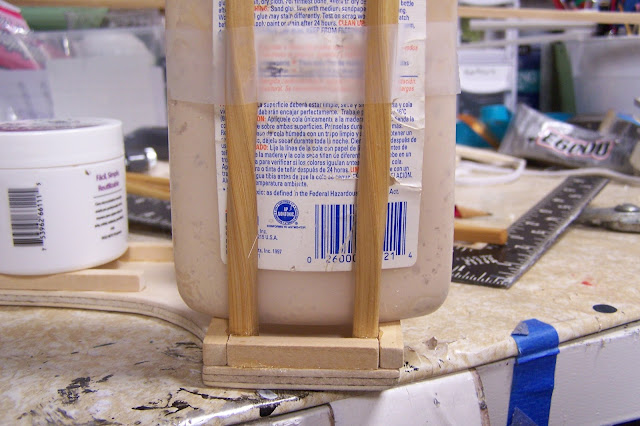
The ends of the chopsticks and the glossy finish really didn't want to take the gel glue, so I used E-6000 and created supports I taped the legs to to allow them to dry straight. My supports were bottles that straddled the skirt pieces or went into the corner. Scotch tape was fine for holding them in place.
Angle the legs slightly for a more modern look, or straight.
Seal all your table pieces on all sides with an acrylic sealer. (This will prevent warpage on your table top as craft woods are very porous.) Allow to dry.
You can apply a vinyl stickum sheet to the top. I had planned to leave the edge wood--but it didn't look right so I painted it and the skirt boards to match the table top.
This shelving unit, was an odd Barbie piece purchased at a thrift store, I've used multiple times in 5 years. I added a single shelf to the middle and used white vinyl stickum to the back pieces to brighten this up and cover the pre-school background. It was the perfect size for this desk.
After I took this photo, I adjusted the one leg on the right. Now it's perfect for installation.
Chris now has the perfect work station in the small master bedroom.
Next Project: What's This???
If you enjoyed this post(s), please join me by email- at
FOLLOW IT---upper right hand corner.
I have not been paid or reimbursed in anyway for my opinions or products shown, or from where I shop.
Please Join me at these Fine Blog Parties!
Thank you for your cooperation, Sandi


Great, I can't wait to do some modern table with the other ends! Now I wish I had picked up more of them.! thanks for stopping by!Sandi
ReplyDelete