BARBIEOLDNEWGREENREDO--JUST A GRANNY HAVING FUN WITH DOLLS< DIORAMAS STORIES AND DIY

BARBIEOLDNEWGREENREDO

The Devil in the Details: Windows,Doors, and Trims.

Always AD-FREE

This is the second part of Permanent Plywood Walls. Windows, Doors, Trims! 


barbieoldnewgreenredo

Here is the door jambs and trim in the Bakery section of the DIY Barbie Grand Hotel. On this section of the door, I used plastic trims (edging for plastic windows) from the Lumberyard. Here you can see the end view of these pieces. I trim them to size with a sharp heavy scissors. You could use a knife of sorts, but I think you could slice your hand off.


barbieoldnewgreenredo

The middle piece is as purchased, the others after trimming. You can file or sand off rough edges.


barbieoldnewgreenredo

Usually I use a heavy shears, but I didn't need much trim for the one door. I wanted a lower profile on this door because the wall between the door and refrigerator was very small.

Craft wood is cheaply purchased at Big Box lumber yards. I try and use something heavier than balsa wood. I believe these are pine. Decide how wide and thick you want to use. I used 1/4"x 1/2" pieces. These need to be cut with some sort of saw. I'm working in 1:6 scale and this size ended up being perfect. I used the smaller widths for fill-in on the windows.


barbieoldnewgreenredo

Working wood in miniature scales, 1:12 (dollhouse), 1:6 (Fashion doll) or 1:3(American Girl sized) requires mostly hand tools. For doing the windows and doors in the plywood walls, I used hand tools. 

barbieoldnewgreenredo

This next section is a Repeat from last post: 

My favorite tools for DIY dioramas.

Tools:

A Band saw, jig saw or saber saw can do your curves, if you have any. 
You also can cut curves, window holes, and small trims with a saber saw (electric) or a hand coping saw. I also use a miter saw for cutting small stright edges.

Hand Tools: 

I use hobby knife sets for fine cutting, trimming, planing. These are made by multiple brands X Acto, Xacto, Gordon, Fiskars, and lots of store brands. They are often interchangeable. I have inherited tools from my dad so I have a bit of everything. 


barbieoldnewgreenredo

This was one of my dad's sets. Blades are easily replaced. Most crafters would find this a good set. The different handles are for different sized blades and thickness of blades. 


barbieoldnewgreenredo

I purchased this set in an after Christmas Sale really reasonable. 

barbieoldnewgreenredo

It has a planer, which will shave edges and it's adjustable. 

barbieoldnewgreenredo

The set also has a long serrated blade for small sawing. The handle is great for holding and accurate sawing. I have a small vise(my dad's fly-tying vise) I can clamp anywhere holds pieces still for me. You can also use clamps which are inexpensive.

barbieoldnewgreenredo

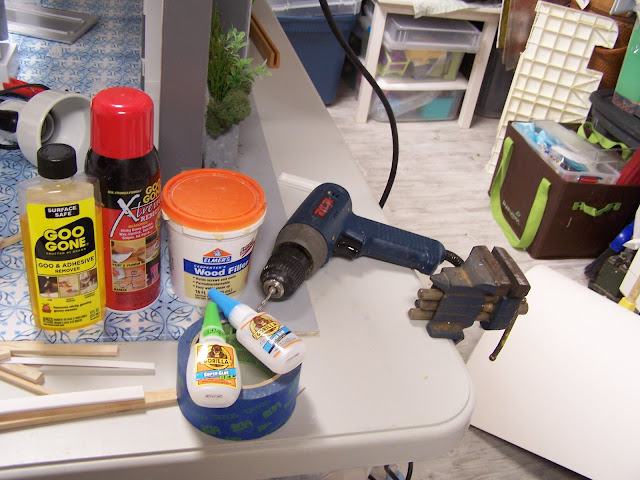
I'm not advertising, but I do use these products and rebuying them repeatedly. Not shown is wood glue, duck tape, and velcro. 

An electric drill sure helps the arthritis, but you can easily use hand drills and screw drivers to do doll crafts. I also have a battery Dremel tool for cutting plastic and drill tiny holes. It also has grinding and sanding attachments. I've burned out 4 in my 50 years of crafting. So, I really do use them for lots of things.  


barbieoldnewgreenredo

Here you can see how I had taped the window onto the original foam core walls. 
Take a look at all the tape if you look close! I'm really excited to frame these out with moldings and trim. 


See how nice everything fits into the 1/4" plywood. I put the smooth side of the plywood to the atrium, The condos can easily use wallpaper to cover up flaws. The DIY doors are left over from the cabinets I made from Barbie wardrobes here: DIY Doll Closets
The white windows were part of a destroyed thrift store Barbie fold out house, fairly recent. It's amazing what kids do to structures, they are either perfect or totally destroyed---nothing in between.

barbieoldnewgreenredo

This is the atrium side of Colette's interior door and window placed in the new plywood wall. The door is framed out on both sides with the wood trim. The 45 degree angles were cut on my small mitre box by hand. The little ledges on the ends of th window are the same wood, turned on the side. The arch pieces hubby cut on a band saw, because we needed 4, 2 for each window. He did this by stacking and nailing 4 pieces of wood with a pattern glued on top, then all 4 were cut at the same time---ensuring they would be the same!
barbieoldnewgreenredo

Inside: Door frame I glued the old rods(pink ends) to the wood. In the center I constructed a new door pin (hinge) holder by drilling holes in the ends of a 1/2x1/2 piece of wood, and then sanding and shaving it into a rounded shape on two sides so the door would clear the wood edge when opening. These were super glued on alcohol cleaned surfaces. It took a couple of tries to get top, middle and bottom all glued. (If not in shut-down I would have purchased in scale quarter-round for this...but it only took under an hour to construct this. 


barbieoldnewgreenredo

I had to do some sanding on the plastic to get the door to open smoothly.


barbieoldnewgreenredo

The wall on the right was still hinged to the window, so no hinges to build. I like that the windows are the same, but the doors are unique to the apartments. The door on the right has to have a piece attached at the bottom, a kick-plate all painted silver...so you won't even see it. Here I'm laying out the wood pieces. Cut all the pieces before you glue anything...!!!!


barbieoldnewgreenredo

On the arched door, I had to carefully draw the angles. Gaps can be filled in with wood putty and/or paint. You can see I used some plastic trim pieces on the white plastic windows, to finish the inside. These were also super-glued. 

I filled in a bit of wood putty on the rougher surface on this interior wall on the right. 


barbieoldnewgreenredo

Here again, you can see the actual wood hinge part in place with the trim built out around it. After cutting and fitting all trim, super glue all the pieces in place, one at a time. I count to 30 while holding pieces in place.

barbieoldnewgreenredo
inside of Lara's condo

 I painted the finished walls/trim with two coats of the pale blue gray paint I used through-out the building. I had used some acrylic shiny fabric paint as caulk on the window irregularities. The color was a perfect match, and two applications and a day waiting for drying patched up any little roughness or holes.


Atrium side of Lara's Condo

barbieoldnewgreenredo

I had to shave this upper piece on the left for the door to clear, it will hardly be noticeable after paint.


barbieoldnewgreenredo

There is no coverup for the silver rods holding the doors on. Trim placed over this will just impede the doors' movements.

I fianlly painted all the trim with two coats of white-satin enamel wall paint.  

barbieoldnewgreenredo
Here are those two interior atrium walls installed with velcro to the original structure in front 

(Tape is holding the walls while the glued velcro sets up.) I had to finally use super glue on this also. The self-stick wasn't strong enough, hot glue peeled off, finally pressure and super glue worked.

barbieoldnewgreenredo

The simple white trim works really well with the soft gray blue. I had taped (green) the refrigerator to hold the goodies inside. The door, will be painted eventually, not sure what color, yet! 


barbieoldnewgreenredo

Colette's is ready to move back in---I'm still not sure how the 'kitchen' door will be attached, I think tape for now, as I will use that hole for camera shots. 
Ready to move back in!

  Maybe Salon Jacquie will be able to open soon when the Covid-19 restrictions are lifted in Chicago. I know her email and phones have oodles of clients already scheduled for appointments. They will open with some modifications---coming soon! I know this is getting to Real????

What are you making for your dolls right now?

All the opinions and photographs in this blog are my own. I HAVE NOT been paid or reimbursed in anyway for my opinions, posts or any products shown or anywhere I shop.

Thanks always for visiting. 
I will try and respond to every comment and answer every question.


 Please do not use photos without linking back to this blog without my permission. 

Thank you for your cooperation, Sandi 


Sharing at these great blog parties:
Thank you for your cooperation, Sandi Magle


Sandi


Photos for the Grandmas

Always Ad-Free

Jacquie and Vanessa work on the mailing lists for the Salon in the dining room. Niece Kimmy yawns.

barbieoldnewgreenredo

Jacquie: What are we going to give all the Grandma's for Mother's Day? Usually I give them all a free spa day...can't do that with social distancing and the salon closed.

Kimmy: (Yawns)

Vanny: I think the baby is ready for her nap. Mama, how about a family photo? We haven't had one for a long time, not since Kiara was a baby, and now she is six. The Grammas and Great Grams will love that.

Jacquie: Well, everyone is home, and Kimmy can go down for a nap. Tres just painted the wall in the basement, that would be a good place. Can you put the baby down and I will get Craig to find the camera stand.


An hour later: Jacquie, Kiara(6), Craig, Cassidy(14), Tres(17) and Vanessa(20) are trying to line up for a photo.


barbieoldnewgreenredo

Jacquie: Stop that now, Kimmy will wake up with all that screeching!

Tres: Mama, I don't screech. Vanny does!

Vanny: Shush! 

Tres: Stop that!

Cassidy: You two are always trouble!


barbieoldnewgreenredo

Jacquie: We need to get closer, please. Kiara sit down nice in Daddy's lap.

Kiara: Tres poking Vanny, Mama.


barbieoldnewgreenredo

Craig: Everyone stand still....click!

Cassidy: Can we hurry, I have a Zoom meeting with the girls at 2:00.

barbieoldnewgreenredo

Jacquie: Vanny stop squirming. 

Vanny: Tres needs to move away.

Tres: I'll sit in front and hold the other BRAT!

Craig: Let's just get this over with.


barbieoldnewgreenredo

Cassidy: Go Cubs! That should make everyone smile.


barbieoldnewgreenredo

Craig: That should be good enough.

Jacquie: Sure, it's the only present we can give your mom and my mama, Great Grams and it just has to be good enough. Now my hair came undone. Tres, get off the basement floor!

Vanny: I checked the photos, Mama. They are great and we are a beautiful family!

barbieoldnewgreenredo

MISSION ACCOMPLISHED!


Jacquie: I hear Kimmy and I've had enuf! I'm going upstairs.

Cassidy: I'm outta here.

barbieoldnewgreenredo

Craig: HOLD IT! Okay, gang. One more photo for your mother. And try to sit still and smile! 

Kiara: For Mommy! 

Cassidy: Oh, Dad, you're the best.

Craig: I have the best kids, most of the time, but that's your Mom's doing.


Jacquie stands on the stairs and listens...and gets a tear in her eye.

For all those families trying so hard out there...


Happy Mothers' Day! 

Thank you for visiting, I will try and respond to every question and comment. 

Please follow me at these great blog parties:


Hotel: Foldable Plywood walls

Ad-Free Blog

My bad weather project has rehabbing a Grand Hotel by Mattel for Barbie.


Definitely an OLD NEW GREEN REDO, post.


Hotel: Making Grand Hotel  Permanent Walls with plywood.

I quickly realized, when I kept walking into the fold-out ends of the Mattel Grand Hotel
(now my GRAND VIEWshops and condos) 
and the foam core just isn't strong enough for
doing battle with my BODY.  I needed something that would fold all the way around so I could take photos and work on the interiors, and do my doll stories.

Hubby brought home 1/4"-one good side plywood, AC grade, the cheapest option. Plywood is lighter weight than hardboard and holds hinges better and nails!

barbieoldnewgreenredo

Foam Core Walls: On the back side, you  can see where I had to make the patch above the lower right door. Too many openings weaken the foam core. Using thicker foam core would work but at $5-6 a for 20"x30" sheet, might as well use plywood. 


barbieoldnewgreenredo

 The windows in the HOTEL...the reason I bought the totally wrecked hotel was the windows. No front door, but I thought oh, those windows! 


barbieoldnewgreenredo

Since I already had the foam core walls, I had perfect patterns to make the new pieces. UPSIDE: I do have a husband that loves to putter in the workshop 
so he quickly made all the cuts for me. 
I could have done this myself, but Sh-Sh-h-h-h, we won't tell him that. 
This is the first floor inside wall with the doors/refrigerator in the bakery shop.
barbieoldnewgreenredo
Before: A real challenge were these second floor window walls between the condos and the (hole) is the atrium. This is Colette's condo on the East side. Luckily I had used white duck-tape to attach the windows and door frame to the foam core. 
barbieoldnewgreenredo

I simply pulled the windows/doors out and retraced the outlines. Curves are actually easier on a jig-saw then trying to cut curves in foam core.
I made a few adjustments for fit with hand tools. 

barbieoldnewgreenredo

See how nice everything fits with this 1/4" plywood. I put the smooth side of the plywood to the atrium, The condos can easily use wallpaper to cover up flaws. 

barbieoldnewgreenredo

Here are the new plywood walls in place. They are designed to fold up almost flat. Double check everything before attaching hinges. If you are working with a plastic structure, don't expect everything to be level or square.

barbieoldnewgreenredo

Furniture or cabinets will all be able to be removed by attaching with velcro. This is Lara's condo kitchen which needs some shelves and cabinets, I can attach those with velcro also.

Hubby glued and screwed the hinges for me and sanded off the ends of the brass screws. A little glue in the pre-drilled screw holes keeps them from stripping the thin plywood. The screws will be invisible on the inside. I have no idea if I will finish the outside of the walls to look the building or not. If I ever drag it anywhere for display---maybe, lol.  Meanwhile the hinged panels will give me access for photographs.

Supplies and Tools needed to make wood walls for miniature 1:6 structures.

Supplies: 

Paper, cardboard, or foam core for patterns (Since I work with Mattel original structures, I have to be flexible on construction because everything isn't square or level.) This is why I'm attaching these pieces with velcro. I've had good luck with gel-Gorilla super glue, I'm sure any would work for attaching even sticky velcro. 

1/4" AC plywood (has one good smooth side-most economical). Lumberyards sell 2x4, 4x4, and 4x8 pieces. Some lumber yards will cut pieces to your dimensions into square or rectangular pieces. Make sure you don't ask for this on a weekend.

barbieoldnewgreenredo

Above: Small cabinet hinges- 2-3 sets for each set of panels. Thin plywood also needs to be painted on both sides to keep from warping. (Brass decorative hinges are the thinnest, but whatever works for you. I like these because they go both directions and make nice tight corners inside the structure.) 


Wood filler, Sandpaper, or foam sanding blocks 

Paint with primer-any wall paint will work a with a couple of coats, I prefer satin finish because it is washable and can handle sticky tapes and products. Craft paints are just wall paint in satin finish. I don't use spray paints on bare wood---if you want to spray paint, seal the wood with a primer/sealer, first. Remember to finish both sides at least with primer.

TIP: Tint smaller amounts of white wall paint with craft acrylics, lots cheaper than buying quarts of individual colors.
 I always peruse the reduced paint screw-ups for useable paints for projects. Quarts are sometimes only $3...or so. I use spray paints for anything plastic, and craft paints for details, then sealed with acrylic sealer (in winter) or clear spray sealer in warmer months.

TOOLS: 

barbieoldnewgreenredo

Left to right Top:
Pencil, tack hammer(has a smaller head), measuring tape, square, hobby knives. 

Lower Left to right.
Screwdriver which takes different size heads, miter saw, coping saw, with aluminum miter box inside, wire clippers, small sharp scissors, pliers, lg. scissors, three files(flat, 3-sided, 1/2 round.) sandpapers, lightweight upholstery stapler. 


Here's another tool set-up: scissors, heavy wire cutter, awl (sharp point for making/starting holes), needle-nose pliers, long flat screwdriver, putty knife, pliers, coping saw, Dremel tool(grinds, sands, cuts, drills--just about any material at high speed, excellent for cutting plastic structures apart.)

Some of my favorite tools.
Power Tools:
I recommend electric saws for cutting large-wall sized pieces, or have the lumberyard cut your pieces to size for an extra cost.

Straight cuts can be made on a table saw or a circular saw with a steady hand. Use a fine toothed blades to get smoothest edges on thin plywood.

An electric band saw, jig saw or saber saw can do your curves, if you have any. 

You also can cut curves, window holes, and small trims with hand tools: a hand coping saw or a small cut saw, single blade with a handle works fine.
I also use a miter saw and box for cutting small straight edges and 45 degree angles. 

For cut-outs: Drill a hole in the middle of the wood---and insert your tool's blade and cut from there (coping saw or saber saw blade). Hand tool cuts will require extra filing, planing and sanding to get smooth edges.

More tools, Coping saw, wire cutters, putty knife and screw driver.
                         
Other Hand Tools: 

I use some hobby knife sets for fine cutting, trimming, planing. These are made by multiple brands X Acto, Xacto, Gordon, Fiskars, and lots of store brands. They are often interchangeable. I have inherited tools from my dad so I have a bit of everything. 


barbieoldnewgreenred
This was one of my dad's sets. Blades are easily replaced. Most crafters would find this a good set. The different handles are for different sized blades and thickness of blades. Surprisingly, I have used most of these blades for one thing or another.


barbieoldnewgreenredo

I purchased this set in an after Christmas Sale reasonable. It really is designed for the hobby craftsperson. The thinner blades are great for shaving off areas, even rounding wood.

barbieoldnewgreenredo

It has a planer, which will shave straight edges and it's adjustable. It's tricky adjusting, but well worth it when it is set to the right depth.

barbieoldnewgreenredo

The set also has a long serrated blade for small sawing. The handle is great for holding and accurate small wood sawing. To the right is a tweezers, I use several types for lots of stuff. Sometimes for a finger to hold glued pieces. 


barbieoldnewgreenredo
I don't advertise, but I do use these products and re-buy them repeatedly. Not shown is Elmer's or Gorilla wood glue and velcro. The Goo Gone is a must for removing glue, stickers, old paints. The spray can version of Goo-Gone actually disintegrates superglued pieces apart. (Especially fingers---slowly spray several times as you pull fingers apart--no ripped skin.) Wash your hands immediately. 

An electric drill sure helps the arthritis, but you can easily use hand drills and screw drivers to do doll projects. The small vise was my dad's for fly-tying, perfect for holding tiny pieces of wood or plastic.

Back to the Walls. 

barbieoldnewgreenredo

Hinges are pre-drilled and screwed in with wood glue. Then Hubby ground off the tips of the screws on the inside. (Using larger screws gave a better hold in the thin wood. 1/4" plywood is really thin but durable.


barbieoldnewgreenredo

The west side bakery wall corner.


               The east side Salon corner, tiny gap. I'm really pleased with how the new walls firm up the entire structure.


I'm going to add some cove molding at the ceiling on the first floor. You can see daylight coming through, due to the slight warpage of the plywood. This is caused by the slight gap of the thickness of the velcro.


barbieoldnewgreenredo
The double hinges here, allow me to open 1/2 or all of the left wall. In place I can also open the right wall, the hole is the 'door to the kitchen' in Colette's condo. 


barbieoldnewgreenredo

The wooden Atrium walls on the second floor are working great. They will have a small molding on the floor to support them. The kitchen door hole again on the left, I have to hinge that, or tape it in place. 

barbieoldnewgreenredo

Here is Colette's apartment from the first hinged wall open. It opens completely to be flat against the other piece.


barbieoldnewgreenredo
You can see the Velcro lined up. I've used self stick which isn't happy on all surfaces, and then hot glued it again. So far, most pieces are working fine.

barbieoldnewgreenredo
Lara's Kitchen wall all finished and painted. The wall shelves and cabinets need to be attached.

barbieoldnewgreenredo
I will still use some foam core wall inserts for separating the bathroom in Lara's. This will easily lift to photo the all of the small studio sized condo.

barbieoldnewgreenredo

The foam tape on the floor anchors the sink. I still haven't figured out now to anchor the door on the shower. This happens when you cobble parts from various structures. 


barbieoldnewgreenredo

One thing Mattel doesn't do is make walls high enough in any of their structures. Dolls are up to 12" tall now--in heels, more. So, I've added an extra inch and a half---for my walls, for taking photos. This is the East side


barbieoldnewgreenredo

And the West side, Lara's still unfinished studio condo.

Everything I do inside these condos will be temporary---as I will use the same footprint for the fictitious multiple floors for NEW owners. I hope to have 6 more condos from these two...and maybe even a Penthouse...I wonder who would want the Penthouse...Hmmmmm! 

Next post: Moldings and Trim: painting and touch ups! 

What Structures or Dioramas have you redone, even if it is just paint and paper? 

Thank you for visiting, I will try and respond to every question and comment. I will be doing further posts on tutorials for the Hotel and contents.

Please follow me at these great blog parties:


barbieoldnewgreenredo