Ad-Free Blog
Hi, I'm sure you have enjoyed all the photos of Jacquie's Salon, the lobby and Sindy's Patisserie in the ground floor of the Grand View (Mattel rehabbed Grand Hotel). Well part of all that ambiance was lighting. I thought going battery power would be cheaper than electric lighting. NOT SO!
Here are all the lights I had in the ceiling. Those great press lights that hook up with magnets to the ceiling(sometimes)...totally eat batteries. I had hedged at spending $40-ish dollars for plug in permanent lighting. Thinking that temp or battery would be sufficient to do the 5 foot by 20" grand hotel. Lots of light comes down the atrium lobby, but all this wasn't really enough, especially when I had to turn on 8 switches each time and turn them off again when done. The homemade hanging lamps are still great, but I may choose to change those also.
Here is the Hotel emptied and the walls pulled off (I use velcro to attach them) and open when I need to take photos or work inside.
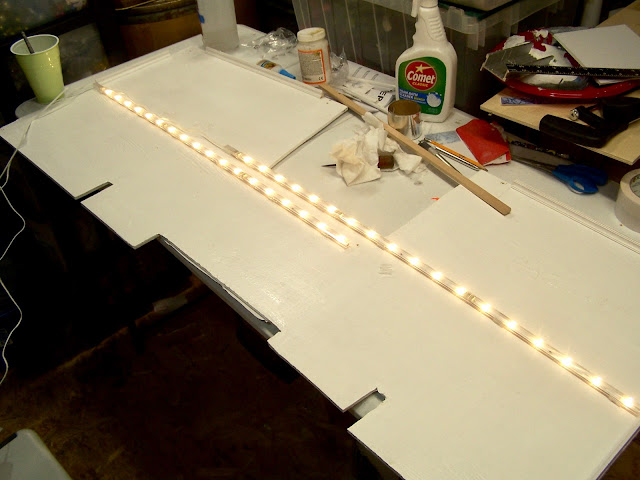
I had bought this LED light tape with clips---that actually changed colors after Christmas. The directions said you could make 1" diameter turns? and apply with the sticky backing.
Here's the tape...a nice bright light---16 feet, but...turning corners when lying flat wasn't possible even a 30 degree turn wasn't possible, it kinked horrible. And, someone had stolen all the clips from the box, and the sticky back stuff didn't work at all,
despite a smooth clean surface.
I totally canned that solution. I can use them somewhere else outside!
Here I am trying to figure out if I could mount it to the sides. Totally not workable.
There are lots of flexible strips on the market---for me---this did not work at all. It is flexible around things, but lying flat not!
I dismantled the hotel central pillars and removed the rest of the jointed second floor. Normally I like to leave as much of an original structure as possible. But I hacked and sawed all the rest of the second floor off, just leaving the small strips of original floors attached to the front to place the fitted wood floor over. Support wise, I don't need any pillars, they were just decorative.
We had used a larger set of IKEA lighting for the Grand's dollhouse here:
It had been very successful and is still working 5 1/2 years later.
It was 4 weeks before I got to IKEA, they don't ship lighting except with like an entire kitchen order, and covid kept me away from making the trek. I bought three sets of 3pc. Ledberg lighting. Which is in 11" straight pieces in that you can use 1, 2, or 3 pieces together. Nice thing is there are no exposed parts and they have screw in clips which are very secure. There are several different types of cabinet lighting sets, choose what works best for you.
Here is a closeup of the clips. Easy to pull out also.
Lots of cord between fixtures...and switches.
The atrium hole is in the back center. I have always planned on finishing molding around the atrium hole, and that will be next.
Removing the pillar block supports was pretty easy I just twisted them off and then tipped over the whole structure and removed the screws.
Here you can see the plastic floor supports along the front wall where the floor is fitted over.
I had to test the lighting. I think this works well. Not too bright! but definitely fills the space. PS---the lighting for this floor cost about $30.00...less than 4 years ago.
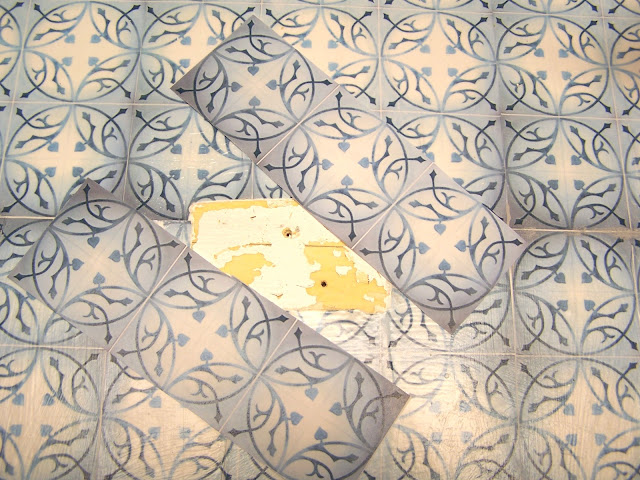
Here's from the other end---that's a lot of tile...luckily I saved a couple of sheets from the doing the orginal floors.
The color had mellowed a bit since they were applied.
I fitted like six tile images over the holes which I cleaned and wiped with alcohol. Good old modg-podge, wrinkled but then shrunk out when dried.
You can see a slight variance in color---but a coating of sealer will add just a bit of yellowing to make it match exactly.
I'm so glad to have this done, and when the hotel is put back together it will be great. I have some moldings to change. I really need the room in the workroom right now, so it will be packed a way for a month or so, so I can catch up with other projects.
LIKE OPENING
MY NEW ETSY SHOP
Devoted to DOLLS AND TOYS!
Stay tuned!
What sort of lighting
do you use for your dolls?
PS. I am not advertising the products I use, I simply state a name brand because I actually like and use the product. I have not received any payment, gratuity, or product for using the products shown.
Thanks for viewing and feel free to ask me any questions or inquiries, and I will get back to you.
Please Join me at these Fine Blog Parties!
Thank you for your cooperation, Sandi


Thank you for this good idea. Waw 😲
ReplyDeleteHonestly, I think I spent $45.00 on batteries in the last year and a half...UGH! There are several types of this lighting, like 4 strips with separate cords, so you could do a shelving unit with one system. Designed for under kitchen cabinets, really, amazing! Thanks for stopping by!Sandi
DeleteLighting (for any pic) is always such a challenge! Glad you found something that works well:@)
ReplyDeleteHi Lynn, I just got tired of being out of batteries. Just too many for that big (Hotel) of an installation. I'll still use them in Vickie's but I will slowly remove them from everything else I think. I have found small book lights with a bit of an arm, useful to light up a scene, too.
DeleteHi, Linda...yes, the actual installation of the lighting took maybe 20 minutes. Two clips per light..and done. Granted, I will be doing some trim...but in say a finished shelving unit...a quick job and you can drill holes to make it work in anything.
ReplyDeleteWow...this is IMPRESSIVE! I'd like to be your next door neighbor just so I could come over and watch you put this together! That looks like a LOT of fun, Sandi!
ReplyDeleteOH, if you ever....ever... come to the US...please you have a 'bed' here for sure! Speaking of which there is a Mattel/Barbie design contest....for designers...YOU HAVE TO...! I would love to see your designs in the doll world! Grins, sAndi
DeleteYou are committed to your Craft, Wow, a lot of planning, work and experimentation required to get the right results. I bet you could build and wire a real Home now?! *Winks*
ReplyDeleteI'm too old to do this stuff in RL...but can sure manage a mini world. We have built everything. I actually designed pool houses, patios, additions, garages for my hubbies summer construction company. Now the darn battery lights are just too expensive. No more. Wait until you see what I do with the Bar that will be in the basement of the 'hotel'...too cool! Just our style, a bit out there! Hugs, Sandi
DeleteTook me time to read all the comments, but I really enjoyed the article. It proved to be Very helpful to me and I am sure to all the commenters here! It’s always nice when you can not only be informed, but also entertained! LED Exit Signs
ReplyDeleteHi, Michael. Thank you for taking the time to view the blog---and comment. I see you are in the industry--hobby dollhouse lighting hasn't changed in over 70 years...still the same old failing mini light fixtures and antiquated lighting systems. While you service industry and big projects---a trip into the hobby world might be great for one of your clients...we are breathlessly waiting for adequate lighting for our mini-houses and doll world! Thanks again, Sandi
Delete