BARBIEOLDNEWGREENREDO--JUST A GRANNY HAVING FUN WITH DOLLS< DIORAMAS STORIES AND DIY

BARBIEOLDNEWGREENREDO
Showing posts with label lighting dioramas. Show all posts

Trish's New Flower Shop Part 3: Lighting, Fixtures and Cooler

Ad-Free Blog 

We finally have some crappy rainy weather, so I'm back in the craft room to finish up the flower shop. On the agenda yesterday was to finish lighting, fixtures and mounting and lighting the cooler.


barbieoldnewgreenredo

Still on the work table, the flower shop is roofless, but I cut down the walls and then mounted some electrical 'ball' lights around the outside and in side. 

barbieoldnewgreenredo

The lighting system is pretty straight forward. As I try to wean myself off battery systems, I pick up electrical strings of lights on sale, that might be used for fixtures. These 'ball lights' were discounted and have been in my stash for awhile. The roof piece is simple foam core, with an eave extension on the front and sides of the building. In the foreground you are looking at the back corner.

I measured and decided where the fixtures might look best. Then I had to layout the wires, zig-zagging between the lights. I cut holes the size of the top of the ball fixture, unscrewed the 'balls' and then inserted the cap through the ceiling. the ball was then screwed back on flush with the ceiling. The tops were then super taped to the foam core to hold them in place straight. Pretty simple and quick and not high-tech at all. I look at the dollhouse lighting systems and shudder.

barbieoldnewgreenredo

This is the cooler mounted on its stand, and all the 'pots' are made from electrical conduit.

barbieoldnewgreenredo

After trimming off the glued felt bottoms, I added a rock or two to each pot to make them stable.

barbieoldnewgreenredo

The cooler was Super Duck taped to the back wall. Three holes were drilled in the top of each section for the same ball lights.  I unscrewed the 'ball shades' and taped the light bases and let the bulbs through the holes drilled into the plastic case. The light is soft and diffused, actually quite nice.

barbieoldnewgreenredo

Trish: Hi, I'm really trying to finish the layout in here. The new shelving fixtures were all made from I-Phone boxes. Super nice finish and very crisp surfaces with some covered in white contact paper. We have faced some of the shelves with left-over flooring (paper). I'm loving my work/service counter, (also a cut-down phone box) which is waiting for it's custom top. My electronic register will be mounted on the wall, to save space. Most of my customers use cards...so no need for a huge register.

barbieoldnewgreenredo

Trish: I love the shelving, I'm not sure exactly where everything will go, yet.

barbieoldnewgreenredo

Trish: The cooler is up and running and will be filled with fresh flowers and arrangements. I have a monster cooler in the back room, as well as a large work area. 

barbieoldnewgreenredo

Trish: Tomorrow will be a very big day of moving in and getting the entire shop up and in place, so we can finally open.

barbieoldnewgreenredo

Trish: I'm very happy to have the huge windows which will be great for displays.

barbieoldnewgreenredo

Trish: Taking photos will be interesting as there is a bit of reflection and bounce back. While the shop is small, we will be able to service customers all year-round now, instead of commuting from St. Charles which is over 50 miles away.

barbieoldnewgreeneredo

Trish: I've taken a studio at the GrandView (Lara's old place) which is only a block away. The garden center will be managed by my brother, while I  concentrate on our corporate clients and neighborhood customers. The business grows in leaps and bounds, much like the revitalization of this neighborhood 

barbieoldnewgreenredo

Trish: Outside we will have room for floral containers for fresh flowers as well as plants. This will nicely connect with the Blue Sprinkling Can Garden Center, which will be right outside the door.

barbieoldnewgreenredo

Trish: Well it's getting late, and tomorrow is a big day! Signing off from Trish from Trish's Flowers and the Blue Sprinkling Can Garden Center. I'm loving the outside lights, they will really give the shop a presence. 

barbieoldnewgreenredo

Psssst, don't tell Trish what a disaster the garden center is in---while we've been waiting for the finished building to be slipped into its location! 

Yes, I have a really busy day or two---yet...hope it keeps raining!!


Does the weather affect your DOLL PLAY?

If you enjoyed this post(s), please join me by email- at 
FOLLOW IT---upper right hand corner.

I have not been paid or reimbursed in anyway for my opinions or products shown, or from where I shop. 


Grand View (Grand Hotel) Lighting Upgrade

Ad-Free Blog

Hi, I'm sure you have enjoyed all the photos of Jacquie's Salon, the lobby and Sindy's Patisserie in the ground floor of the Grand View (Mattel rehabbed Grand Hotel). Well part of all that ambiance was lighting. I thought going battery power would be cheaper than electric lighting. NOT SO! 

barbieoldnewgreenredo

Here are all the lights I had in the ceiling. Those great press lights that hook up with magnets to the ceiling(sometimes)...totally eat batteries. I had hedged at spending $40-ish dollars for plug in permanent lighting. Thinking that temp or battery would be sufficient to do the 5 foot by 20" grand hotel. Lots of light comes down the atrium lobby, but all this wasn't really enough, especially when I had to turn on 8 switches each time and turn them off again when done. The homemade hanging lamps are still great, but I may choose to change those also.

barbieoldnewgreenredo

Here is the Hotel emptied and the walls pulled off (I use velcro to attach them) and open when I need to take photos or work inside.

barbieoldnewgreenredo

I had bought this LED light tape with clips---that actually changed colors after Christmas. The directions said you could make 1" diameter turns? and apply with the sticky backing.

barbieoldnewgreenredo

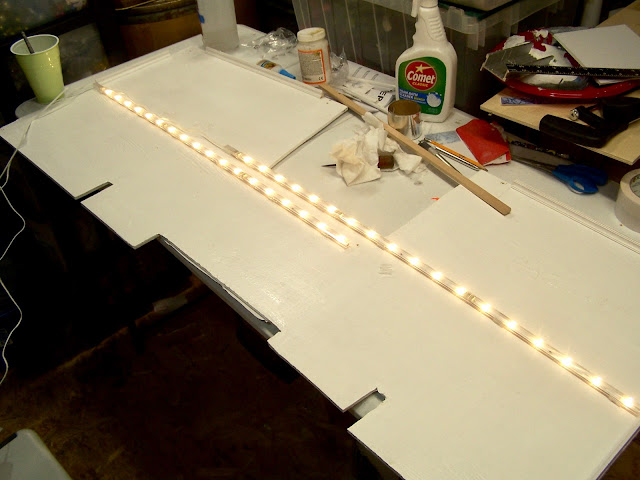
Here's the tape...a nice bright light---16 feet, but...turning corners when lying flat wasn't possible even a 30 degree turn wasn't possible, it kinked horrible. And, someone had stolen all the clips from the box, and the sticky back stuff didn't work at all, 
despite a smooth clean surface.
I totally canned that solution. I can use them somewhere else outside! 


barbieoldnewgreenredo

Here I am trying to figure out if I could mount it to the sides. Totally not workable.
There are lots of flexible strips on the market---for me---this did not work at all. It is flexible around things, but lying flat not! 

barbieoldnewgreenredo

I dismantled the hotel central pillars and removed the rest of the jointed second floor. Normally I like to leave as much of an original structure as possible. But I hacked and sawed all the rest of the second floor off, just leaving the small strips of original  floors attached to the front to place the fitted wood floor over. Support wise, I don't need any pillars, they were just decorative.

barbieoldnewgreenredo

We had used a larger set of  IKEA lighting for the Grand's dollhouse here:
It had been very successful and is still working 5 1/2 years later.

It was 4 weeks before I got to IKEA, they don't ship lighting except with like an entire kitchen order, and covid kept me away from making the trek. I bought three sets of 3pc. Ledberg lighting. Which is in 11" straight pieces in that you can use 1, 2, or 3 pieces together. Nice thing is there are no exposed parts and they have screw in clips which are very secure. There are several different types of cabinet lighting sets, choose what works best for you.

barbieoldnewgreenredo

Here is a closeup of the clips. Easy to pull out also.

barbieoldnewgreenredo

Lots of cord between fixtures...and switches. 

barbieoldnewgreenredo
The atrium hole is in the back center. I have always planned on finishing molding around the atrium hole, and that will be next.

barbieoldnewgreenredo

Removing the pillar block supports was pretty easy I just twisted them off and then tipped over the whole structure and removed the screws.

barbieoldnewgreenredo

Here you can see the plastic floor supports along the front wall where the floor is fitted over.

barbieoldnewgreenredo

I had to test the lighting. I think this works well. Not too bright! but definitely fills the space. PS---the lighting for this floor cost about $30.00...less than 4 years ago. 

barbieoldnewgreenredo

Here's from the other end---that's a lot of tile...luckily I saved a couple of sheets from the doing the orginal floors.


barbieoldnewgreenredo

The color had mellowed a bit since they were applied.

barbieoldnewgreenredo

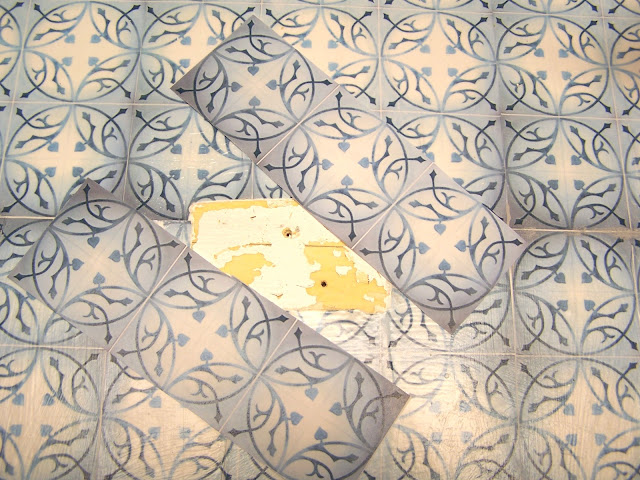
I fitted like six tile images over the holes which I cleaned and wiped with alcohol. Good old modg-podge, wrinkled but then shrunk out when dried.


barbieoldnewgreenredo

You can see a slight variance in color---but a coating of sealer will add just a bit of yellowing to make it match exactly.

I'm so glad to have this done, and when the hotel is put back together it will be great. I have some moldings to change. I really need the room in the workroom right now, so it will be packed a way for a month or so, so I can catch up with other projects.

LIKE OPENING 
MY NEW ETSY SHOP
Devoted to DOLLS AND TOYS! 
Stay tuned! 

What sort of lighting 
do you use for your dolls? 

PS. I am not advertising the products I use, I simply state a name brand because I actually like and use the product. I have not received any payment, gratuity, or product for using the products shown.


Thanks for viewing and feel free to ask me any questions or inquiries, and I will get back to you.