BARBIEOLDNEWGREENREDO--JUST A GRANNY HAVING FUN WITH DOLLS< DIORAMAS STORIES AND DIY

BARBIEOLDNEWGREENREDO
Showing posts with label 1:6 diorama. Show all posts

Vickie's Vintage DIY: How to make the store fixtures and displays,


We took a mini-vacay this week, so I'm still catching up. 
When work was still being done on most of the shop. (originally posted 2018), I'm hoping to continue this long as we have readers. Below, you never know what you may find in a thrift store---definitely peruse the frames...I've picked up windows, doors and even a bench...from frames.)


barbieoldnewgreenredo

Vickie found this great door at a thrift shop (it's a photo frame) and the scale is perfect.


barbieoldnewgreenredo

We Painted one coat of silver over the red...left it blush just a bit.

barbieoldnewgreenredo

Then I added some gel-medium (you can also use watered down modge-podge) to some Charcoal Gray acrylic paint(think craft paint--I avoid Apple Barrel--it's thin and pigment lacking) and then quickly painted and then immediately wiped it off with paper toweling, and let it sit over night. This technique is called glazing.

The girls put on sticker letters and Victorian flourishes. Here, Vickie cleans the residuals off the glass. 

In the Bridal Boutique, the closets are ready to set up.


Tutorial on painting plastic doll closets is here.DIY Doll Closets.

barbieoldnewgreenredo

The girls filled the spaces with color grouped clothes---The full skirts really eat up the floor space. Hose, shoes and accessories were added to the shelves. Everything a party girl may need, well we need more accessories here.

barbieoldnewgreenredo

Where the handles were on the top of the closets, were two raised screw holes---I put a piece of bent coat hanger into the holes to display dresses on. Double- stick tape holds shoes on small squares of white cardboard, easier for moving around and not permanent. Luckily my basement walls are gray and extend the 'look' of the shop. We are just a foot from the real basement ceiling and the vent is above, so I block the whole shop off with a piece of foam-core to keep it clean, when not in use.


barbieoldnewgreenredo

The first cabinet on the left ended up being all pink/maroon. Goodness, Mattel's heavy on pink. 
The Mirror guy--WAS still slacking off. (lol, me)

(In 2023 and now this area on the left and along the stairs holds Tuxes and Ken's seasonal dress clothes-below)


Carpet on the second floor was cut from new placemats. Other furnishings,... 

barbieoldnewgreenredo

 the benches were cut from an existing deep box thrift store frame. These were made so easy, two cuts for Hubby's mitre saw and then I used silver spray paint.

barbieoldnewgreenredo

They benches were supposed to be for customers to sit, but Vickie crashed and took a nap---sigh, what a slacker...lol.


barbieoldnewgreenredo

Original 2018, these were odd thrift store finds---the desk/pencil cabinet, added a top, (a fairy garden fence), and the body jewelry stand was perfect fashion doll size.(This poor doll tipped over and broke---and eventually replaced by 2  Gray doll Mannequins,) 


(The DIY post for mannequins HERE.)  


barbieoldnewgreenredo

This cabinet is still handy for jewelry, hair accessories, mini purses or fill the cabinet with toiletries. It changes with the seasons. (We still use this and it what it holds is always different)

barbieoldnewgreenredo

The Jewelry doll form had a few purses and a low profile wedding dress. We added some bling and it was fab! (I was limited as to what I type of dress I could display on this.)


barbieoldnewgreenredo

Another thrifted jewelry stand----white and holds everything.  
2026 note: This piece was purchased second hand. But, they are still available reasonable on Temu in black and for $$$ at Michaels, but just a spray away makes it a perfect fixture in your color choice.

And it still works wonderfully, I can have multiple shoppers around it, spin for photos, and usually has a seasonal display on top with three separate outfits.

barbieoldnewgreenredo

This 'First Display' was color and style coded and filled with fashions, purses and belts. Even some room for  suitcases below.

barbieoldnewgreenredo

Carly kept busy cleaning the last of the construction dust. The cabinet behind her, held swimsuits, underwear, and camisoles. (This cabinet has been replaced with acrylic box designed for real life organization.)
as shown today below.


It's fabulous for a seasonal displays---mixing clothes and accessories! (Last Fall). It was a thrift store makeup organizer.
barbieoldnewgreenredo

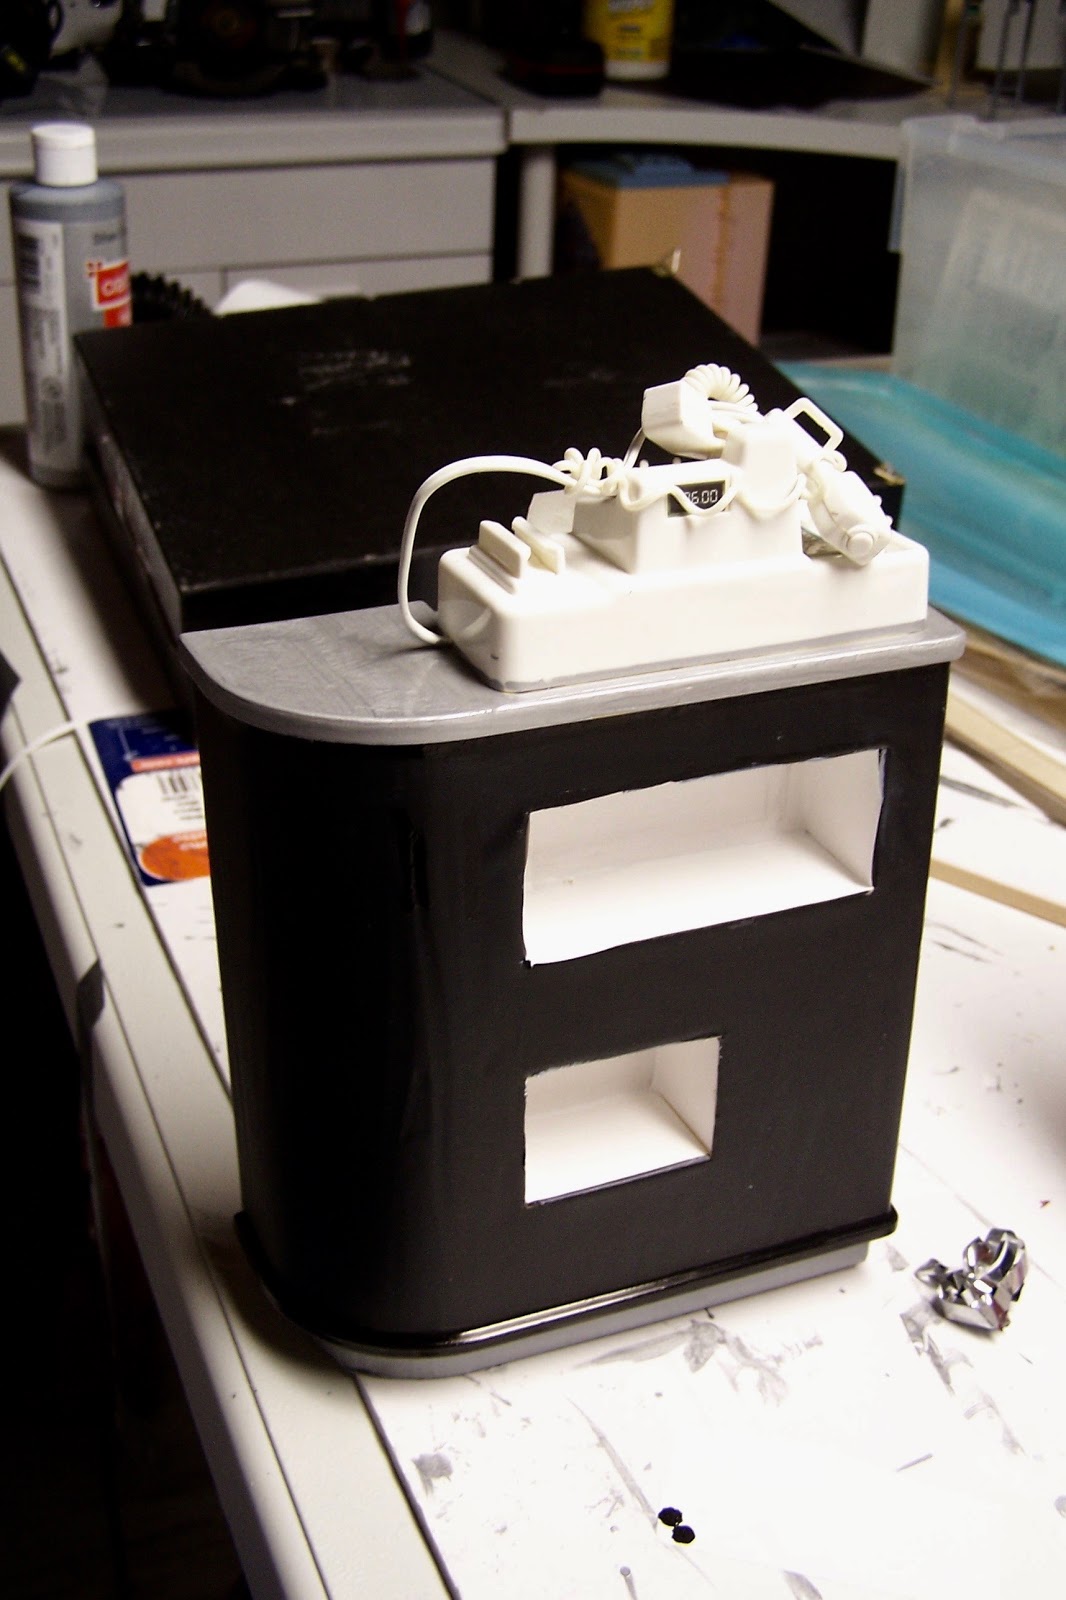
I freshened this checkout (thrift store) with some silver tape, black contact paper, and some white stickum paper in the cubbies.
(It's still the perfect counter with a working money drawer, phone, and charge card 'bings' when it is used.)

barbieoldnewgreenredo

 The Grand loved it. I didn't do anything on the back. ($1.99 was a steal). Oh, the girls store bags in the holes below.

barbieoldnewgreenredo
The shoe shelves was two shadow boxes with glass covers, I pulled off the covers and reset the hinges so the cubby parts are hooked together and it can be used straight or cornered.

barbieoldnewgreenredo

Eventually the corner set up was perfect for the shoe shelves. Here, Zoe straightened all the shoes and purses in here. (Now I only keep shoes in here), purses are designated in this display, below)


The bottom piece was thrifted and has 5 shelves, which  switches out. Fall and Winter has lots of boots, so we need more room. The second shelf was purchased from $ store and works great as most purses fit inside) .
The whole thing is taped together and stuck to the wall.  Or, one bump and you get a cascade of accessories on the floor. 


No space goes unused, so top of the accessory shelves are these hat mannequins and coordinating clothing hung on push-pins through the foam core upper wall.

(2026 This is still the favorite of my doll blog. We switch it out maybe 3-4 times a year...and it's great having shoes and accessories easily accessible for quick changes.)

(back to the story)
Upstairs hums with an Undetermined Sound: Zzzzzzzzz-Zzzzzzzzzz-Zzzzzzzzz.
 
Zoe: What is that! (She looks around)
Zoe: Carly can you hear that noise...?

barbieoldnewgreenredo

Zoe: Never mind, I think it is coming from upstairs! I'll check.


barbieoldnewgreenredo

Zoe: Vickie---it's time to wake up----we open in a couple of hours. 
Vickie: Uh, ....oh...? What time is it? 
Zoe: Almost 5, you had better go home and change! The Grand Opening Party at 7pm.

barbieoldnewgreenredo

Vickie: Okay, Ladies----hold the fort. The flowers still have to arrive and the mirror guy. I'm going home to take a shower, um...everything looks great and thank you so much for everything you both do!

Carly: Sure, hurry back and please bring coffee. We sure need some.

Vickie: Anything for my team. If Joe calls, tell him I'm on the way home.

(Next---I think the Grand Opening...and tour)

All the opinions and photographs in this blog are my own. I have not been paid or reimbursed in anyway for my opinions, posts or any products shown or anywhere I shop.

Thanks always for visiting. 
I will try and respond to every comment and answer every question.

 Please do not use photos without linking back to this blog without my permission. 


Sharing at these fine blog parties! 


Thank you for your cooperation, Sandi Magle


Sandi

Vickie's Vintage...and how it was built, Part 1

 Ad-Free Blog


Hi, All. Some things going on with the dolls, slow but sure!

Barbieoldnewgreenredo


Finally, the girls empty Vickie's Vintage for the construction of a second floor for a bridal/formal salon. Holds on construction have been due to typical Chicago building code snags and decisions.

Barbieoldnewgreenredo

Back at Vickie's townhouse---
Richelle presents storyboards for choosing surfaces for the new construction.

Richelle: This board I call 'pearly'...with a bit of dull gold trim.
Vickie: I like the flooring, it looks to be the similar to the HFIM house. 


Barbieoldnewgreenredo

Vickie: This pearlized paper would be pretty in the dressing rooms. 

Barbieoldnewgreenredo

I love the flooring

Barbieoldnewgreenredo

Ah, this will be a great blend with the existing silvered cement floors on the main level. This model really gives me an idea of what it might look like.

Barbieoldnewgreenredo

Richelle: Well, this is the 'silver' board, all dulled surfaces, except this glittered paper.
Vickie: Oh, that is too much glitter, I like this softer one below though. I see you used the same flooring. I really the like the look of the silver palette.

Barbieoldnewgreenredo

Richelle: Yes, this goes well with both palettes. And is durable and luxurious.

Barbieoldnewgreenredo

Richelle: Here is my suggested layout for the upstairs with display closets and racks along the back wall, with seating banquettes at the railings. A center dais in front of a huge tri-fold mirror. Two massive chandeliers should light the entire balcony and will show through the exterior windows.

Barbieoldnewgreenredo

Richelle: (Holding her breath) I hope you like it, so we can go forward. I actually have a source for the closets. We can decide on the details, as we go along. I have to check with BMR Ltd. and see what will be considered as building improvements and to get their okay.

Barbieoldnewgreenredo

Vickie: Can we make the closets portable, or is that impractical? I've had three changes since the shop started. I've really learned to be modular. 

Richelle: The source closets I have in mind are pretty flexible. We could put them on wheels under the kick plate, but we will have to anchor them to the walls then for safety, maybe with a locking mechanism.

Vickie: So many decisions. What were you planning to use for railings?

Richelle: Clear acrylic to keep it nice and airy. I was hoping to find clear banquettes, also. 

Vickie: Hmmm, I really like that idea. Nothing to obstruct the view of the new level. Great, whatever is feasible and okay with the building codes. BMR has been super---Ms.Roberts wants to do renewal on this entire block. Richelle, you've done a fabulous presentation, I love it all. Let me know when I can see these closets. 

Barbieoldnewgreenredo

Richelle: Well, I'm so thankful for the referral to work for you and BMR, it's a great start for my career.

Vickie: What about your wedding? I thought it was going to be next month?

Richelle: We are both so busy with work, we've bumped it to sometime in fall, maybe October. My Dad and Uncle are both really busy from now on until then. (Sigh)

Barbieoldnewgreenredo
Vickie: If you haven't found a wedding dress, maybe you can be my first customer.

Richelle: I hope so---! LOL, if we get all our projects, done!
Vickie: Now, l love the board you made for the for the townhouse. I can't wait to start on at least the floors now, and cover the couch with that turquoise fabric you brought. It's perfect.


All the opinions and photographs in this blog are my own. I have not been paid or reimbursed in anyway for my opinions, posts or any products shown or anywhere I shop.

Thanks always for visiting. 
I will try and respond to every comment and answer every question.

 Please do not use photos without linking back to this blog without my permission. 

Sharing at these Fine blog parties!
Thank you for your cooperation, Sandi Magle
Sandi

Structures: Grand Hotel, an Overview for all ages.

 Ad-Free Blog

I'm very anxious to get this project up again...it was hastily taken down when we had a flood. Basically the entire doll room was packed up in less than 2 hours, I had 5 helpers...and well...life, the dollroom got really scrambled. 

I'm doing an overview to show you the project's inception and some finished bits, before I unpack the "Grand Hotel" which I renamed the GrandView.

This takes up so much space, an entire 6 foot table with the bakery kitchen extension that no one has even seen yet, just some posts on working on it.

The Grand Hotel I found for $10 was faded in poor condition with dead electrical, doors missing, no accessories, but the elevator worked.

Wood laid out to increase the height of the first floor. Blue tape is where the new wall will be constructed. Pillars are Cake pillars which will support the new second floor.

I wanted to make a couple of condo's upstairs and two shops and a small office downstairs, also a lobby area across from the doors.

Since all Mattel structures are stingy on space, I started to plan a deeper building. Here you see the structure opened flat out with some of the existing floors removed. I built new floors to make the floor 22" deep instead of the barely 12" it was. 


I added a wood 2"x4" wood foundation made to look like concrete to raise the main floor and increase the height to the ceiling. The new outside walls were to be created by foam core. the entire piece rests on a plywood base.

To keep the construction process entertaining I had Lara as overseer of the project and Russell the contractor participating in the design and problems.

I even had guys working on the building...that post is actually FUN!

I even did posts of the dolls...on and off the job. LOL.

Adding that 'footing' of wood  made all difference in the height.

There was tons of measuring and lots of trial and error...here the floor is laid out before gluing to the new plywood floor. The wood 2x4's are trimmed and painted to look like concrete.

 The  small white blocks are for the pillar bases to make pillars line up  to evenly support the second floor.


This shows you what had to be added to create the  lobby of the building. The blue tape defines the open atrium area on the second floor. 


Of course I made poster board patterns...the elevator had to be left open to function. The right side would become a 'studio' condo.


Russell and Lara checking out the new floor. Note how the elevator levels to the new floor---WIN!


Which ended up looking like this when 'tiled' to match the downstairs.


The atrium was filled with plants windows and railings on the second floor.


The condos were restored with cobbled parts from thrift store Barbie structures and windows.


Side and back walls were foam core and secured with velcro as well as the pillars. This is still early in the construction...the hole in the wall is for a built-in cooler for the bakery.


my tile...I tweaked until I got just the shades of color I wanted.


Bakery window and outside eating area.


Old Mattel counter redone....and lit with battery lights. The upper shelves are a makeup organizer from a thrift store.


A two story stained glass window was 'uncovered' in the demolition..a supposed restyle that was covered it up in the 1920's.  The 'window' was printed on pieces of vellum and mounted on plexiglass which filled the back atrium hole with a planter and an added settee.


The atrium becomes a meeting place to share a cup of coffee and some delicious bakery from Sindy's Patisserie.


The Grand Hotel restoration into the GrandView. BMR Ltd. decided on a refined palette of colors... lengthy posts on painting are available at the end of this post.


Salon Jacquie before finishing the remodel. All fixtures were from thrift store finds and redone.


Nail station...repainted from YUCKY Barbie pink.


Remodel of chairs was simply a repaint of acrylic mixed with lots of medium to 'stain' the fabric.
Sadly the opening of the GrandView coincided with the shut down of the US from Covid and all the ramifications of no business operations in Chicago at that time. 
Since I have many young viewers...I did stories with dolls masked...trying to solve their life's problems.


If you are interested in the actual DIY construction and the planning process...simply search  Hotel or follow these links.


These are all mostly construction information posts, there are lots of story posts of the residents, events, holidays...so enjoy my Doll world surrounding 
the Grand Hotel...renamed the GrandView. 

As, you can see...I can't wait to put it up again!


Any questions, or comments I will be happy to answer, just pop it in the comments or send me an email.

Thanks so much for visiting,

 I will post at the following Link Parties, I hope you visit them.


BarbieOldNewGreenRedo, is an ad-free blog.  
I do not endorse or receive any $$ for any products I may use. I enjoy showing how I use products, 
but I do not receive any $$ from anywhere I shop.

Sandi