BARBIEOLDNEWGREENREDO--JUST A GRANNY HAVING FUN WITH DOLLS< DIORAMAS STORIES AND DIY

BARBIEOLDNEWGREENREDO

More Lemonade

AD-Free Blog.

...Or the best laid plans of mice and a woman...?
source http://hilaryclarcq.com.
 It's been nine days since I wrecked my knee, to be exact--tore my medial collateral ligament on my 'good' knee. We are hopeful it will heal, in a month or so. The other knee has already had two knee replacements.


Hence, I have all the gear for being laid up.  See the huge lump on the knee, there, --yep that's still swelling after 8 days. 


Some things have changed since my 2010 knee replacements---like available drugs. And, let me mention that TYLENOL does squat, for an inflamed knee, swelling, and sharp(shudder) pain. Since I'm a senior citizen...other medications are no longer acceptable. I have to love my Doc, though, and he has prescribed a muscle relaxer which helps with all the cramping and I have had two decent nights of sleep, finally.


This is my window view---out there is all the Spring yard work, and planting that needs to be done. Poor hubby will really have a work out. I had managed to clean out the front flower bed, plant some perrenials that needed to be split. But, golly---4-6 weeks is a long time in the Spring of the year, to be laid up.


This what my bedroom view looks like---I can't really even get over there...the walker won't fit. Who knew how precious where your underwear drawer should be? The computer is set for an automatic duty---so I just cross my fingers it's working. 
The pic on the tv...cracks me up--looks like a mashed up knee. 


I've been putting my blogging laptop here, so I can get to it, and then slide it back down safely without having to strain.

Sigh---oh, yea---my blogging. For those viewing my doll blog---barbieoldnewgreenredo, it will be down for at least a few weeks, unless I recycle photos, etc. All my doll and craft supplies/equipment are down in the basement craft room.

My blog-oldnewgreenredo---I might be able to recycle a few photos and post, but, I won't be taking any new photos. (Hubby will do some--he just finished the greenhouse), but none of my Spring projects will be completed. After our awful long winter, we finally have a chance for some nice weather and hopefully I will make it to the porch when it's nice.

I've put my Etsy shop, BarberryLane on Vacation---until I'm able to go to the basement and do the shipping again. 

Well, making tons of lemonade here---and I'll post when I have something useful to share! I am enjoying viewing all the wonderful posts of my fellow bloggers.

6/24 Update finally have a date with a Surgeon, we shall see!


Trish's Security Fence and Tutorial.

AD-Free Blog  


Last episode: At "The Blue Sprinkling Can"---Trish waited for the fence guys to show up, so she could go home.


barbieoldnewgreenredo

Meanwhile her brother arrived with more supplies: dirt, pea gravel, lawn food, organic plant food, and worm compost. 

barbieoldnewgreenredo

She is still waiting on all the bottled and tin goods in the small sizes. Here you get to see the fence set up.

barbieoldnewgreenredo

Foldable, the fence really tucks away during the time the garden center is open.

barbieoldnewgreenredo

Trish: This fence is much easier to close than I thought it would be. Just a quick lock-up and we are all secure.

barbieoldnewgreenredo

Tomorrow is opening day--and we are almost ready. Is anyone ever ready for anything?

barbieoldnewgreenredo

This looks great, the only thing outside the fence is that huge cacti planter which weighs a ton.

barbieoldnewgreenredo

Time to go home! 

Thanks for looking at our New Fence which is a DIY.

Quick Fence Tutorial
What you need:
3/8" craft wood  (remember you need posts on each end and double by your door.
green paint. I used 10" long so I needed 3-36" posts to make my fence posts.

paint---acrylic-- for painting posts whatever color you want.

Plastic coated Hardware cloth, cut into the size sections you need to achieve the total length of your space. This comes in Black coated, silver (uncoated) and Green coated.

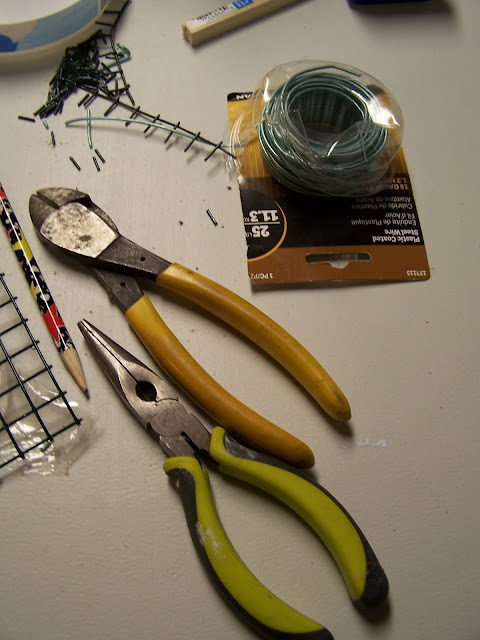
Plastic coated wire, 18guage which is pretty stiff. (mine is True Value and is faint blue color, but looks gray in photos-I also make clothes hangers from this.)


Tools needed:

Needlenose pliers

Drill manual or I used my dremel 

Drill bit a little larger than your wire

Pencil and measuring tape/ruler
paint brush 


barbieoldnewgreenredo

I needed 28" of completed fence with a door in the middle, so I cut 8 posts and 7 pieces of wire panel. 

My panels are 9 spaces by 20 spaces. Roughly 5" x 10". (the wire connecting loops will also provide length. If you make a taller fence you made to have 4 sets of connectors on each post.


barbieoldnewgreenredo

Tools are pretty basic. Yes, you do have to cut each wire separately. 

barbieoldnewgreenredo

I drilled the holes in the center of the post and all the way through.

barbieoldnewgreenredo

I marked and drilled 3 holes: the middle and on each end for connecting the posts to the panels.


barbieoldnewgreenredo

Here I used a generous measure of wire about 2 1/2" and inserted in the holes and then wrapped in the first square and turned tight.


barbieoldnewgreenredo

Here you can see the second loop is cut shorter and then turned in.

barbieoldnewgreenredo

Hook your panels together in the three places. Finish off your ends with the extra posts. To use open and close, just fold them accordion style. I'm loosely attaching them to the walls of the building and the greenhouse. I may make a few more panels for other projects. They are sort of screaming for vines, lol.

barbieoldnewgreenredo

Now Trish can go home and all her creations are safe and sound!