BARBIEOLDNEWGREENREDO--JUST A GRANNY HAVING FUN WITH DOLLS< DIORAMAS STORIES AND DIY

BARBIEOLDNEWGREENREDO

Scale and Arrangement styles with lots of GREEN!

Ad-Free Blog 

I was a floral designer for three major big box stores back when they offered custom design services, (sadly-arrangements are made in China now). I also worked in fresh floral shops, but am allergic to molds...the bane of florists.

I always enhanced my pottery displays at shows with seasonal greens and florals. I taught tons of floral classes, but you really don't have to be a 'Designer' to make miniature greenery arrangements. 

Just, keep it simple!

See previous post for tools and supplies needed.


Choose your pot--for your space. Rule of thumb for an arrangement is 1 1/2 times the height and/or width of the container. So make sure you are close to that scale. Need it smaller, choose a smaller container.

 Keep in mind how large the arrangement will be completed. If you have to draw measurements on paper to control your creation---by all means do so. 

barbieoldnewgreenredo

The container for this shelf is a white plastic blind mounting piece I found in the garage. I've used these for mini-totes, napkin holders, cake pop holders in the bakery and now a pot. The are just over an inch and flat on the bottom and come in different colors. 

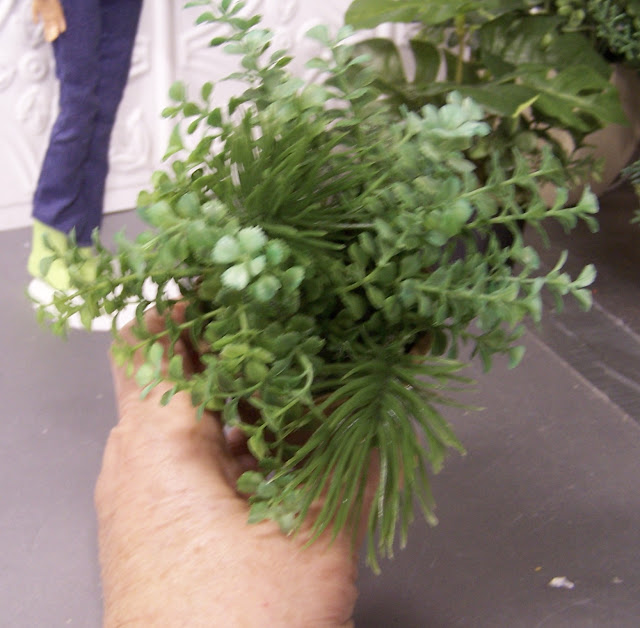
  For small greenery arrangements I generally use only one type of greenery, (pot-1 1/2" or less). Here I used mini-lime eucalyptus, just the tips cut from a bush. Small arrangements are usually shaped all around and balanced.

barbieoldnewgreenredo

This is a mini ceramic pot. I was going for a contemporary look, tall and thin, more than the 1 1/2 rule. Grass, a clover, and an airy weed flower for some muted color. Three elements which is max for this size pot, but works for this location.

barbieoldnewgreenredo

Succulents are so popular now. I found a multi colored one at WMart and used the individual plants for four arrangements in the townhouse. I knew it was the perfect size and tone for this house with a bit of lavender and blue with the muted green. 


barbieoldnewgreenredo

This round pot, just fits on this shelf. It has a pretty strong design, so I used some twigs, one succulent (shape echoes the shape of the pot) and some airy spiky plants bits. (Really only three elements carefully placed.) Tall branches up---one focal point and three fronds arching out from the focal point. 
Design isn't just the shape of the arrangement, but it's relationship to its surroundings. 

barbieoldnewgreenredo

Here Vanessa holds one of those accessory 'ball' wedges with succulents and mini-eucalyptus.

Medium arrangements of up to 3", again I use no more than 3 elements.  Here, 3 mini eucalyptus and 3 small succulents with the moss which I consider an element fills the wedge container for the wall.
This piece is for the bathroom and is simple with 3 elements.

barbieoldnewgreenredo

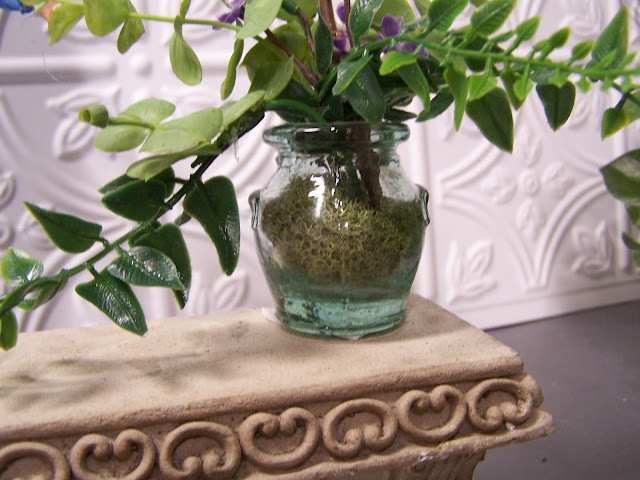
This piece is in a glass jar filled with moss and foam and has three elements: fern, eucalyptus and a branch that sticks up. I showed this in the last post---close up.
The design is simple, branches up, and stems radiating from the center.

barbieoldnewgreenredo

Four elements: This vase has white berries (to the left to coordinate with the pot,) a plant tropical plant in the center (tallest), some lime eucalyptus and a few draping fern fronds. I had something else tall in this, but it was too much as the antique slag glass urn has so much going on. The urn becomes an additional element, making 5. Larger arrangements in large pots, you can get away with 5 elements in your mini-world.

barbieoldnewgreenredo

This is a plum glazed floor pot for doll scale @ 4" tall. Three fronds of fern, two tall and one draping flower twigs, a succulent focal point and some small leaf branches with a bit of smaller dark fern to fill in holes. 

barbieoldnewgreenredo

This  arrangement is just under 1 1/2 times the pot in height which would have been eye height for the dolls, so I kept it a bit lower.  I then widened the arrangement to balance it out with the trailing plants. The fern shapes echo the lines of the tub, but still have a contemporary feel.

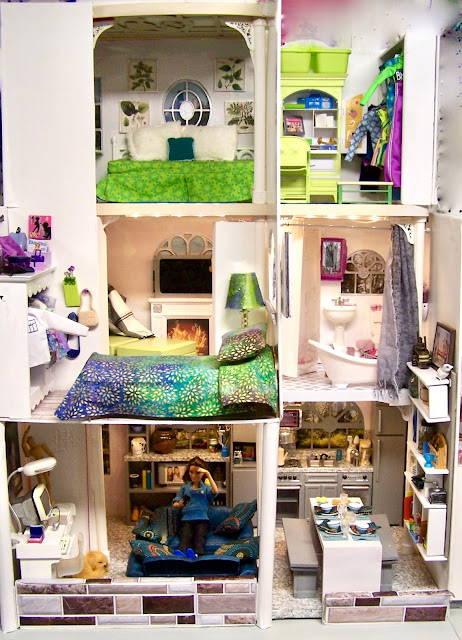
Greenery adds life and realism to your dioramas. If you add flowers-keep it to one kind and simple. 

barbieoldnewgreenredo

This piece is really a floral arrangement but very basic.

The pot is an upside down broken glass drawer knob filled with moss. I also glued some around the top as the hole was so small. A bit of tall grassy stem,  three single roses, some lime eucalyptus, a  sprig of white 'weeds' for a texture and two bits of fern tips. The pot adds a classy look to a simple green/floral arrangement. 

Designs with a tall line representing growth are energetic, while long and low arrangements create 'calm'.


Working in groups of 3's works well for small arrangements. Keep a file of ideas for arrangements from real life photos, and try and duplicate their shape and design and have FUN!

Quick Tips for greenery/florals.

Determine the size of your final piece.
Choose the right size container for the spot.
Keep the number of 'elements' to 1, 3, no more than 5.
Relate the arrangement to its space.

Keep it simple and Have Fun!

If you enjoyed this post(s), please join me by email- at 
FOLLOW IT---upper right hand corner.

I have not been paid or reimbursed in anyway for my opinions or products shown, or from where I shop. 


Getting your Green on: Herbs and potted Trees/Bushes

Ad-free Blog

Do your dioramas and dollhouses need a little life? 

Plants are a great accent and usually 

very economical if you make them yourself.


Choosing greenery for plants for 1:6 scale. I scour 'sale' aisles after seasons for bargain plants in stems and ushes, even garlands and wreaths, always keeping in mind scale. WallyWorld,  $$ stores, and Michaels' are my favorites for new---and of course there always thrift store plants, arrangements or even greenery wreaths available, really cheap.

Flowers and Twig stems:I shop when I see anything reasonable and buy cheap whether I have a plan or not. Think texture---mixing up textures can be very interesting. 

Finding Florals isn't as easy as plants, as blossoms need to be 1/2" or smaller to work for Playscale of 1:6. I do not make flowers or leaves from scratch---but I have cut down or trimmed commercial products to a more workable size.

Containers: Mini's from thrift stores, mini wood, plastic, or ceramic floral pots, beads, candle cups, mini-dishes, bottles, bottle caps, baskets, napkin rings, shot glasses make great containers also.

Basic Tools: Glue gun or glue, scissors, wire clippers, pencil, dowels, toothpicks. (when working with hot glues, something to push down on your mini saves fingers.)

Basic Supplies: Dry floral foam, rocks, modeling clay, skinny duct tape, wire, florist tape, scotch tape, glue, moss ( I use lichen type mosses for mini's)


EASY Project: Making a Kitchen herb garden. The remodeled Victorian house has such great windows---really screaming for plants. 

barbieoldnewgreenredo

I started with some mini 5/8" clay pots I had, and painted them red with paint pens. 

barbieoldnewgreenredo

Since the pots are so small---I used some fine moss to fill them. A touch of glue in the bottom will secure the moss. Take a small 1/16" rod/wood/toothpick and stir a hole in the center of one pot for the taped-plant below.

I took a stem or two from a grass plant and slit some blades in half length-wise. Then I sharpened the ends by clipping. I used a variety of lengths. Trick for really tiny pieces is to make a taped bouquet. Place each blade starting with shortest on each end and the longest spread out in the middle on the double stick tape.  (keeps you from dropping the pieces, everywhere )

barbieoldnewgreenredo

Then tightly wind the tape and blades up....trim off excess at the bottom. Glue the bottom (hot glue or some sort of glue that work with plastic). Insert the plant in the hole in the mossed pot. Great for Chives!

barbieoldnewgreenredo

The pot on the left was made from bits of Christmas Cedar greenery and makes a great Rosemary plant, a mini Eucalyptus plant (just the tips) makes  Basil. These are just hot glued/ or glue on each stem and inserted into the secured moss. Since the stems are soft---you will need to use a good dab of glue. Three to five pieces/stems is plenty for this size of pots.

barbieoldnewgreenredo

This corner sink gives a perfect place for an herb garden.


Potted Trees or Bushes

Generally trees or bushes are evergreens backdrops in dioramas, so I choose small versions of pines, cedar, or palm/plants. Here Trish models with the plants to show the scale of outdoor plantings.


barbieoldnewgreenredo

Containers: The most important thing for potted trees/bushes is to have heavy or weighted containers. Rocks, or a clump of clay in the bottom of a lightweight container will support a large planting, bush or tree. It is a balancing act, the taller the tree/plant the more weight you will need. Plaster is also an option--though messy but, great if you are doing a lot of containers.

 Cut a piece of dry floral foam to size and secure to the container with hot glue or secure with a duck tape weight skinny tape. For smaller pots,  I use low-melt glue glue gun which usually is totally removable, yet will hold foam and small plants/branches. 

Mosses:  I use the lichen type mosses for small projects, just bits and pieces and glue them around the rim of the containers 

barbieoldnewgreenredo

Here I covered a white plastic pot(left) with contact paper to match  the one on the right.  

barbieoldnewgreenredo
These were made from a Christmas bush, the pot on the right has small twigs added to the greens. Both pots are weighted and filled with multiple sized cuttings inserted/glued into the foam.

Trish is shown for scale, I tend to make 'matching' pieces in different sizes. 


barbieoldnewgreenredo

From the top---you can see it isn't perfectly even---plants aren't, but balanced all the way around.

barbieoldnewgreenredo

Filling in the outside edge with small pieces gives a 'natural' shape to your bush.


barbieoldnewgreenredo

This is a large lit planter with many different types of greens and twigs. Think of all those commercial planters you see in shopping centers...and this is a great way to use up odds and ends. This is roughly a 4" square pot, with rocks in the bottom, then the glued in foam and finally moss.

Start with your largest stem branch in the middle towards the back(the twig branch here), Then add a medium pine stem and pull all the pine pieces evenly across the back. Add a few smaller pieces to each side and then something interesting in the front. I used some white mini berries from a wildflower bouquet.

For winter, I added a birdhouse and a few cardinals for color and interest.  Snow is just laid on the branches. Other bits were glued in, or wired if I wished to remove them later. I will update this for the summer season by changing out the twig/snowy branches and adding maybe a flower/berry stem?

barbieoldnewgreenredo

From the back: This was made for a corner display so is flat in the back on two sides. Square planters are perfect for corners. Diorama space is always tight! 

barbieoldnewgreenredo

This was a thrift store tree stuck in a disk of wood which kept tipping over. 
I used clay in the bottom of this pot. It was shallow so I made the foam taller than the edge of the pot, trimmed the edges off round and covered it tightly with different pieces of moss. 

barbieoldnewgreenredo

I made a hole in the center with a pencil, filled it with hot glue and stuck the tree in.
It works and is an easily moveable prop tree.


barbieoldnewgreenredo

This small potted tree/bush is cedar from a Christmas greenery bush, The pot is a weighted one from a commercial plant. I used it's plant somewhere else.

barbieoldnewgreenredo

View from above, I made this piece somewhat flat on the back to be put against the garbage cans. One tall stem, 2 medium pieces and a few bits for the bottom.

barbieoldnewgreenredo

This little plant and pot (peat moss pot) was weighted, and sparsley filled when I bought it, I just added the pine stems into the holes to fill it out. 

I use this piece in lots of out door shots and it gets moved around a lot!

Potted Houseplants

barbieoldnewgreenredo

Actually the tropical in the middle of this pot--was from the white pot shown before. I needed an indoor pot to fill an awkward space in the Victorian by the beam support. The container is a black ceramic candle cup from a thrift store, and heavy enough to support these light weight plants.

barbieoldnewgreenredo

I used three types of greenery here to support the tropical house plant. In the industry we call these  'gardens' when smaller plants support one larger plant.


Glass Pots for Greenery and an ARRANGEMENT

barbieoldnewgreenredo

I had to show you one of the ways to treat a glass pot.  This 'dish garden' was used in a bedroom and has three different 'elements' or types of greens/flowers  in it. Two pieces of flowering twigs, 3 bits of mini-eucalyptus, and 3 trailing plant fronds. The fronds were glued to some wire stem pieces which were bent to drape the fronds over the side and down. You can also bend plastic greenery with a hair dryer, heat it up and coax the shape you want, as it cools it should stay that shape.

barbieoldnewgreenredo

Here you can see I filled the pot with moss. The stems are glued in one at a time, starting from the middle and working outward. Other glass pot fillers for mini's: tiny shells, rocks, gravel, sand, even fruit or beads. 

barbieoldnewgreenredo

Close up here shows the 'wire' on the left frond, it's green which just blends in.
This glass pot was found in a bag of several at a thrift store. Perfect for 1:6 scale.

I confess I was a floral designer for three major big box stores as well as a few florists, I always enhanced my pottery displays at shows with seasonal greens and sold them. I taught tons of classes, but you really don't have to be a designer to make miniature greenery arrangements. 


Just, keep it very simple and have FUN!

Next Post: Scale and Arrangement styles with lots of GREEN!

I have not been paid or reimbursed in anyway for my opinions or products shown, or from where I shop. 


Listing Brochures - Insane Details!

Ad-free blog

Brochures----BMR Ltd. is proud to list two updated historical  properties for sale in northside of Chicago.

Something different today, I made mini brochures for the two remodeled house listings. First I looked up their approximate neighborhood and assessed the possible current value---yikes those neighborhoods are expensive. Draw backs were each property had only two bedrooms---but good thing, each property had expansion opportunities and/or the lower level apartments for income.

(The apartments aren't shown on the brochures due to space limitations)---I'm not totally insane, besides they are very hard to photograph on the floor.

Original photo on the blog.


Designing these full-size in Word, it was pretty much cut and paste. This is the townhouse screenshot, while I managed to lose the original document, this can give you an idea of what a handout might look out. I have left out some information that you would have in RLife listings---because of space. 


Yes, this is an insane detail...but being locked at home gives me the time to 'travel through my 
mini-world insanity'. 

I screen shot the final file and then scaled them on a printing document roughly 1 1/2" wide 12 per 8 1/2 x 11" page--joined the front with the photo page to scale them the same. 
The Victorian was  a bit larger because of the wide shot for the first page and I got 10 on a page.
Just an idea for doll scale 'hand-outs' for just about anything.


Here the Victorian File Folders were made to fit each brochure,with a 'pocket' folded up inside the card stock.

I scissors trimmed the corners of the file folders on the the pocket and top.


A spare drawer becomes the bin for the folders.


BMR says they are FAB!


I used blue for the townhouse folders. The folded white papers are extras---amazing only four folders left after a long day of showings!

NEXT: Potting Trees and Bushes tutorial!

If you enjoyed this post(s), please join me by email- at 
FOLLOW IT---upper right hand corner.

I have not been paid or reimbursed in anyway for my opinions or products shown, or from where I shop.