BARBIEOLDNEWGREENREDO--JUST A GRANNY HAVING FUN WITH DOLLS< DIORAMAS STORIES AND DIY

BARBIEOLDNEWGREENREDO
Showing posts with label 1:6 scale doll closet. Show all posts

Bridal Shop Closet Redux

 Ad-Free Blog

Hi, Dolly friends. Following the last post (Vickie's has always been popular in the last few years, thought we would go back to the beginning.) This is the second of the 'new' Vickie's...my husband built the box for me and the stairs...and the rest is me and my crazy imagination. I'm also a dedicated thrifter and many things are made from items saved from landfills...hence the name Barbieoldnewgreenredo! Enjoy---PS this is one of my most visited posts from Pinterest.
 (I will edit and ad bits here and there, Sandi)

NEW NOTE 2026: I never mentioned in the original post that this upper floor will be a Bridal Boutique,
perfect for Tuxes to Bridal and Party dresses! 

Mattel and other companies have issued so many closet carrying cases for fashion dolls, they now float around the thrift stores for pennies. (They can still be picked up for under $5 in 2026)

barbieoldnewgreenredo
  
I picked up 4 of these in perfect condition, minus a couple of shelves and a small door. They are still being sold new in stores for roughly $15-20. (Now $25-50-2026) Crazy huh!
I suspect they are being purchased for their included fashions rather than the case itself. This is the one I didn't use, but sabotaged parts from.

I paid $1.99 to 3.99 (2018) for each of these. Really much easier than building all kinds of shelving for the new Vickie's Vintage Boutique.

barbieoldnewgreenredo

First thing was removing the stickers from the outside, and dismantling the doors and handles. The handles were a piece of cake only two easily reachable screws. 

barbieoldnewgreenredo

The doors were something else though. I have successfully removed lots of silver pegs from Mattel channels/hinges before. But, these would not budge. Normally a couple of taps with a hammer and screw driver and they begin to slide out---not these. After an hour---of trying on various sets of hinges--I declared a truce and grabbed my coping saw.  

Normally, I would use a Dremel tool saw, but this plastic was very flexible and soft---so it would gum up----as a high-speed tool would melt the plastic, rather than cut it. The coping saw made quick work of removing all the hinge tabs, though not as neatly as I would have liked. I used a file to clean the edges. The doors are all still intact---so, I may be able to use them for another project. And, nicely they are a full 12" tall and can be used for diorama doors!

barbieoldnewgreenredo
I fitted the cabinets in the unfinished room----and yes, they will work perfectly. Now, that PINK, ugh.
I had some serious issues removing the paper decals on the right sections of each cabinet, despite soaking the areas with alcohol. The rest came very clean. 
barbieoldnewgreenredo
                                     

I make it no secret, I really dislike pink. Not pink in general---but the continuous use of pink on items that would never be this PINK in Real Life, ie ---a pink stove??? However, there are lots of wonderful textures on the panels of these closets. After a thorough cleaning and wiping down every surface with alcohol, (this is truly necessary for good paint bonding). I removed all the shelves and doors. I decided the hanging bars will stay black---so there is no chance of the hangers scraping paint off them. I may eventually replace them with metal---we will see how they hold up.

barbieoldnewgreenredo

We finally had a moderate day, that was dry, to spray and paint-spray and spray. (Recommended temperatures are important when spraying...I got some nasty leathering of surfaces in too hot temps). 

The three closets and shelves all took three coats of white satin spray---for plastic. I used a little over one can. (I still recommend Rustoleum Spray Paint for plastic, satin for Barbie and other manufacturers).

After spraying them all white, I covered the straight bar sides with shiny silver stickum from the scrap book section. I opted for a roll designed for those cutting machines that was on sale, instead of buying sheets. This was my first experience using adhesive backed plastic made for cutting machines. The quality was better than anything else I have used before.

barbieoldnewgreenredo

The girl's worked very hard on these cabinets....getting them installed with a little help.

barbieoldnewgreenredo

I left the little translucent shelves pink. A little pink goes a long way. The detail trim on the drawer fronts were done with a store brand oil-paint pen in silver. A perfect match for all the other silver.  (Acrylic paint pens are now very available and just as good.)
I have to figure out how to secure these two units together, might try some white plastic corner molding?


barbieoldnewgreenredo

The backs of the problem sections were covered with silver adhesive plastic, like the kind you use in scrapbooking cutting machines. I have smoothed out most of the bubbles since these pics. But, it was very easy to work with and didn't stretch like other products, and it was on sale. 
It does add a bit of bling, and the store is basically gray and white, so silver is a natural choice.

barbieoldnewgreenredo

(Here you get a view of the layout of the shop...It was designed to fit ontop a certain size dresser. The walls are thin plywood, the bottom floor a bit thicker. the stairs are wood. 2026)

The shop is coming along. Vickie is wondering if she needs to use a different rack now, since the stairs has used up some floor space. We will see. 
(2026 I did use a new rack, and note...I still pick up these cases, and still reuse the doors.) Every bedroom has a closet of some sort, and having a particular dolls clothing accessible instead of buried works well, unless you are looking for a particular outfit and don't know who is hoarding it at the moment!) LOL.

Supplies and Tools for this project:
Existing plastic doll closet(s) or carrying case(s).
Screw driver 
File
Hacksaw or coping saw to remove parts if desired.

Alcohol to clean all surfaces and remove any sticker residue

Spray paint for plastics-1 can almost did 3 units, front and back- 3 coats (necessary to not have pink show through)

Paint pens- I used silver or desired color for details (and white for touch ups) Oil or acrylic based pens work well
.
Scrapbook paper or metallic self stick paper for inside or doors if you choose.

Exacto knife--to cut paper or adhesive paper

Square and straight edge for cutting papers

Double stick tape if using scrapbook papers for wall paper. Paint for stairs and walls, 

All the opinions and photographs in this blog are my own. I have not been paid or reimbursed in anyway for my opinions, posts or any products shown or anywhere I shop.

Thanks always for visiting. 
I will try and respond to every comment and answer every question.

 Please do not use photos without linking back to this blog without my permission. 


Sharing at these fine blog parties!


Thanks for visiting and  for your cooperation, 


Sandi

The Devil in the Details: Windows,Doors, and Trims.

Always AD-FREE

This is the second part of Permanent Plywood Walls. Windows, Doors, Trims! 


barbieoldnewgreenredo

Here is the door jambs and trim in the Bakery section of the DIY Barbie Grand Hotel. On this section of the door, I used plastic trims (edging for plastic windows) from the Lumberyard. Here you can see the end view of these pieces. I trim them to size with a sharp heavy scissors. You could use a knife of sorts, but I think you could slice your hand off.


barbieoldnewgreenredo

The middle piece is as purchased, the others after trimming. You can file or sand off rough edges.


barbieoldnewgreenredo

Usually I use a heavy shears, but I didn't need much trim for the one door. I wanted a lower profile on this door because the wall between the door and refrigerator was very small.

Craft wood is cheaply purchased at Big Box lumber yards. I try and use something heavier than balsa wood. I believe these are pine. Decide how wide and thick you want to use. I used 1/4"x 1/2" pieces. These need to be cut with some sort of saw. I'm working in 1:6 scale and this size ended up being perfect. I used the smaller widths for fill-in on the windows.


barbieoldnewgreenredo

Working wood in miniature scales, 1:12 (dollhouse), 1:6 (Fashion doll) or 1:3(American Girl sized) requires mostly hand tools. For doing the windows and doors in the plywood walls, I used hand tools. 

barbieoldnewgreenredo

This next section is a Repeat from last post: 

My favorite tools for DIY dioramas.

Tools:

A Band saw, jig saw or saber saw can do your curves, if you have any. 
You also can cut curves, window holes, and small trims with a saber saw (electric) or a hand coping saw. I also use a miter saw for cutting small stright edges.

Hand Tools: 

I use hobby knife sets for fine cutting, trimming, planing. These are made by multiple brands X Acto, Xacto, Gordon, Fiskars, and lots of store brands. They are often interchangeable. I have inherited tools from my dad so I have a bit of everything. 


barbieoldnewgreenredo

This was one of my dad's sets. Blades are easily replaced. Most crafters would find this a good set. The different handles are for different sized blades and thickness of blades. 


barbieoldnewgreenredo

I purchased this set in an after Christmas Sale really reasonable. 

barbieoldnewgreenredo

It has a planer, which will shave edges and it's adjustable. 

barbieoldnewgreenredo

The set also has a long serrated blade for small sawing. The handle is great for holding and accurate sawing. I have a small vise(my dad's fly-tying vise) I can clamp anywhere holds pieces still for me. You can also use clamps which are inexpensive.

barbieoldnewgreenredo

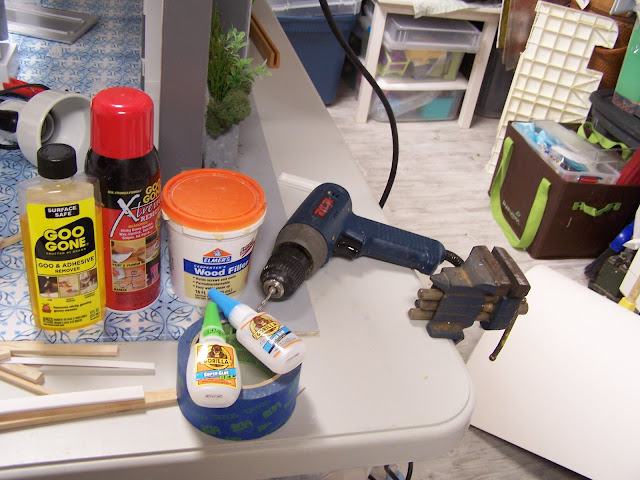
I'm not advertising, but I do use these products and rebuying them repeatedly. Not shown is wood glue, duck tape, and velcro. 

An electric drill sure helps the arthritis, but you can easily use hand drills and screw drivers to do doll crafts. I also have a battery Dremel tool for cutting plastic and drill tiny holes. It also has grinding and sanding attachments. I've burned out 4 in my 50 years of crafting. So, I really do use them for lots of things.  


barbieoldnewgreenredo

Here you can see how I had taped the window onto the original foam core walls. 
Take a look at all the tape if you look close! I'm really excited to frame these out with moldings and trim. 


See how nice everything fits into the 1/4" plywood. I put the smooth side of the plywood to the atrium, The condos can easily use wallpaper to cover up flaws. The DIY doors are left over from the cabinets I made from Barbie wardrobes here: DIY Doll Closets. 
The white windows were part of a destroyed thrift store Barbie fold out house, fairly recent. It's amazing what kids do to structures, they are either perfect or totally destroyed---nothing in between.

barbieoldnewgreenredo

This is the atrium side of Colette's interior door and window placed in the new plywood wall. The door is framed out on both sides with the wood trim. The 45 degree angles were cut on my small mitre box by hand. The little ledges on the ends of th window are the same wood, turned on the side. The arch pieces hubby cut on a band saw, because we needed 4, 2 for each window. He did this by stacking and nailing 4 pieces of wood with a pattern glued on top, then all 4 were cut at the same time---ensuring they would be the same!
barbieoldnewgreenredo

Inside: Door frame I glued the old rods(pink ends) to the wood. In the center I constructed a new door pin (hinge) holder by drilling holes in the ends of a 1/2x1/2 piece of wood, and then sanding and shaving it into a rounded shape on two sides so the door would clear the wood edge when opening. These were super glued on alcohol cleaned surfaces. It took a couple of tries to get top, middle and bottom all glued. (If not in shut-down I would have purchased in scale quarter-round for this...but it only took under an hour to construct this. 


barbieoldnewgreenredo

I had to do some sanding on the plastic to get the door to open smoothly.


barbieoldnewgreenredo

The wall on the right was still hinged to the window, so no hinges to build. I like that the windows are the same, but the doors are unique to the apartments. The door on the right has to have a piece attached at the bottom, a kick-plate all painted silver...so you won't even see it. Here I'm laying out the wood pieces. Cut all the pieces before you glue anything...!!!!


barbieoldnewgreenredo

On the arched door, I had to carefully draw the angles. Gaps can be filled in with wood putty and/or paint. You can see I used some plastic trim pieces on the white plastic windows, to finish the inside. These were also super-glued. 

I filled in a bit of wood putty on the rougher surface on this interior wall on the right. 


barbieoldnewgreenredo

Here again, you can see the actual wood hinge part in place with the trim built out around it. After cutting and fitting all trim, super glue all the pieces in place, one at a time. I count to 30 while holding pieces in place.

barbieoldnewgreenredo
inside of Lara's condo

 I painted the finished walls/trim with two coats of the pale blue gray paint I used through-out the building. I had used some acrylic shiny fabric paint as caulk on the window irregularities. The color was a perfect match, and two applications and a day waiting for drying patched up any little roughness or holes.


Atrium side of Lara's Condo

barbieoldnewgreenredo

I had to shave this upper piece on the left for the door to clear, it will hardly be noticeable after paint.


barbieoldnewgreenredo

There is no coverup for the silver rods holding the doors on. Trim placed over this will just impede the doors' movements.

I fianlly painted all the trim with two coats of white-satin enamel wall paint.  

barbieoldnewgreenredo
Here are those two interior atrium walls installed with velcro to the original structure in front 

(Tape is holding the walls while the glued velcro sets up.) I had to finally use super glue on this also. The self-stick wasn't strong enough, hot glue peeled off, finally pressure and super glue worked.

barbieoldnewgreenredo

The simple white trim works really well with the soft gray blue. I had taped (green) the refrigerator to hold the goodies inside. The door, will be painted eventually, not sure what color, yet! 


barbieoldnewgreenredo

Colette's is ready to move back in---I'm still not sure how the 'kitchen' door will be attached, I think tape for now, as I will use that hole for camera shots. 
Ready to move back in!

  Maybe Salon Jacquie will be able to open soon when the Covid-19 restrictions are lifted in Chicago. I know her email and phones have oodles of clients already scheduled for appointments. They will open with some modifications---coming soon! I know this is getting to Real????

What are you making for your dolls right now?

All the opinions and photographs in this blog are my own. I HAVE NOT been paid or reimbursed in anyway for my opinions, posts or any products shown or anywhere I shop.

Thanks always for visiting. 
I will try and respond to every comment and answer every question.


 Please do not use photos without linking back to this blog without my permission. 

Thank you for your cooperation, Sandi 


Sharing at these great blog parties:
Thank you for your cooperation, Sandi Magle


Sandi


Vickie's Vintage 2020

AD-Free Blog

Vickie's is always so full of shoppers you probably can't see a thing. The store has been Spring cleaned for late winter and resort wear, as well as seasonal prom and wedding dresses. 

barbieoldnewgreenredo

The center of Vickie's has a rotating rack with 4 sides, side 1 is casual dresses and skirts! (I mix in some Sparkles Girls dresses for my grand girl to choose, she likes the bright colors over the vintage.)


barbieoldnewgreenredo

Vickie adds new items with her vintage selections!

barbieoldnewgreenredo

Lots of vintage goodies here! I'm amazed at the detail on the older items.


barbieoldnewgreenredo

Vintage Barbie jewelry on plastic canvas backed with thin cardboard.


barbieoldnewgreenredo

Rack side 2, fancy short dresses and a few tops. Lots of purses work on the hooks.


barbieoldnewgreenredo

The shoe rack is always popular, freshened with lots of summer colors and still a few short boots for Chicago winters.


barbieoldnewgreenredo

Rack side 3, has more dresses, slacks/jeans and lower shelf has large totes, purses and luggage. 

barbieoldnewgreenredo
This cabinet has lots of accessories and lingerie. 

barbieoldnewgreenredo

On top are resort items, swimsuits, totes and glasses! Vickie loves to dress this area and it changes often!

barbieoldnewgreenredo

Rack Side 4 has vintage jackets and tops...and a few yoga mats.


barbieoldnewgreenredo

Whoops, the checkout counter was tipped over to clean under!
The accessory center has 4 drawers of new hair accessories and...

barbieoldnewgreenredo
...Vickie's DIY lotion/soap line.
Jewelry is this and that...with a few extra accessories. The bracelet holder is actually a tape covered glue stick 
mounted on a little board.

barbieoldnewgreenredo

All closed up---this fixture (RL vanity accessory) works so well!

barbieoldnewgreenredo

Upstairs is Bridal and Formals.

barbieoldnewgreenredo

Most of the dresses are definitely vintage. Pantyhose and accessories are displayed with the dresses. Three cabinets showcase the wide array of colors and product. 

barbieoldnewgreenredo

Lots of fun fabrics, shoes, and accessories...an empty shelf, something sold. 

barbieoldnewgreenredo

On top of the closets are jackets and accessories! 

barbieoldnewgreenredo

Sometimes Vickie has short dresses on top also. The bridal salon has helped Vickie's to be successful in an expensive rental market.
Fictionally located on the north side of Chicago near the HFIM house. 

barbieoldnewgreenredo

Clothes are always on hold, waiting to be wrapped up, and collected by the (fictitious) customers. 
Always great shopping at Vickie's!


Thank you for visiting, I will try and respond to every question and comment. 

Please follow me at these great blog parties:


barbieoldnewgreenredo