
AD-Free Blog
 |
| barbieoldnewgreenredo |
Meanwhile her brother arrived with more supplies: dirt, pea gravel, lawn food, organic plant food, and worm compost.
 |
| barbieoldnewgreenredo |
She is still waiting on all the bottled and tin goods in the small sizes. Here you get to see the fence set up.
 |
| barbieoldnewgreenredo |
Foldable, the fence really tucks away during the time the garden center is open.
 |
| barbieoldnewgreenredo |
Trish: This fence is much easier to close than I thought it would be. Just a quick lock-up and we are all secure.
 |
| barbieoldnewgreenredo |
Tomorrow is opening day--and we are almost ready. Is anyone ever ready for anything?
 |
| barbieoldnewgreenredo |
This looks great, the only thing outside the fence is that huge cacti planter which weighs a ton.
 |
| barbieoldnewgreenredo |
Time to go home!
Thanks for looking at our New Fence which is a DIY.
Quick Fence Tutorial
What you need:3/8" craft wood (remember you need posts on each end and double by your door.
green paint. I used 10" long so I needed 3-36" posts to make my fence posts.
paint---acrylic-- for painting posts whatever color you want.
Plastic coated Hardware cloth, cut into the size sections you need to achieve the total length of your space. This comes in Black coated, silver (uncoated) and Green coated.
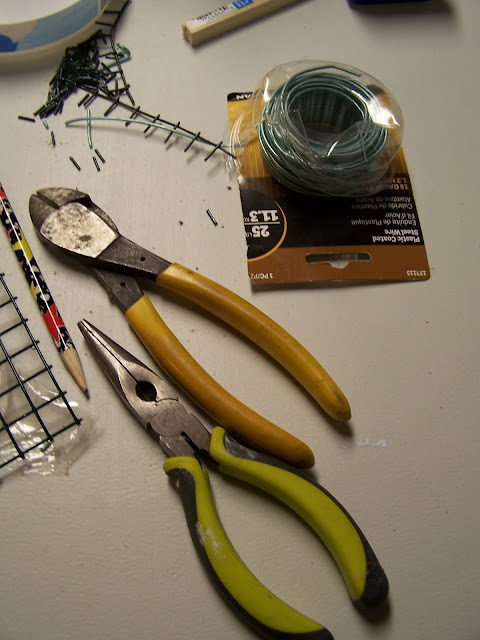
Plastic coated wire, 18guage which is pretty stiff. (mine is True Value and is faint blue color, but looks gray in photos-I also make clothes hangers from this.)
Tools needed:
Needlenose pliers
Drill manual or I used my dremel
Drill bit a little larger than your wirePencil and measuring tape/ruler
paint brush
 |
| barbieoldnewgreenredo |
I needed 28" of completed fence with a door in the middle, so I cut 8 posts and 7 pieces of wire panel.
My panels are 9 spaces by 20 spaces. Roughly 5" x 10". (the wire connecting loops will also provide length. If you make a taller fence you made to have 4 sets of connectors on each post.
 |
| barbieoldnewgreenredo |
Tools are pretty basic. Yes, you do have to cut each wire separately.
 |
| barbieoldnewgreenredo |
I drilled the holes in the center of the post and all the way through.
 |
| barbieoldnewgreenredo |
I marked and drilled 3 holes: the middle and on each end for connecting the posts to the panels.
 |
| barbieoldnewgreenredo |
Here I used a generous measure of wire about 2 1/2" and inserted in the holes and then wrapped in the first square and turned tight.
 |
| barbieoldnewgreenredo |
Here you can see the second loop is cut shorter and then turned in.
 |
| barbieoldnewgreenredo |
Hook your panels together in the three places. Finish off your ends with the extra posts. To use open and close, just fold them accordion style. I'm loosely attaching them to the walls of the building and the greenhouse. I may make a few more panels for other projects. They are sort of screaming for vines, lol.
 |
| barbieoldnewgreenredo |
Now Trish can go home and all her creations are safe and sound!
Thank you for visiting, I will try and respond to every comment and answer every question.

The fencing turned out great!
ReplyDeletePS-I did find some of the Barbie size gnomes... Really cute:@)
Oh, i'm glad--the gnomes were adorable---and so cheap. Fencing is a bit time consuming was craving my husbands old sheet metal cutter that cuts a wide swath---but we don't have it anymore, that would make cutting quick work.
DeleteThis Planter Nursery miniature is just amazing Sandi!
ReplyDeleteThanks so much, Dawn. It really is fun to create without being totally exhausted, like working in the real yard.
DeleteSo fun! Thanks for sharing at Vintage Charm!
ReplyDeleteThanks, my mini world is so relaxing than tackling the real yard, LOL.
DeleteIt's an amazing and very creative ideas. Thanks for sharing.
ReplyDeleteThanks for visiting, I try and do a lot on my own, but with found objects also! Sandi
Delete