
Bagdad Diorama: Back Drop Construction
Ad-Free Blog
General Information: This particular set of Bagdad diorama was built to specific dimensions (less than 24"x24") and to be transportable (low weight), easily assembled without tools, and mostly with 'found items'. The exception was the base and walls, which I decided to construct from 1" thick Foam Sheet insulation sheets. Insulation sheets come in 4' x 8' sheets or smaller pieces are a premium price.

Here you can see the cut pieces of walls and the pink base before they are prepared for receiving paint.
Hubby first brought home a 24"x24" piece of PINK dense (more expensive) sheet foam for a base. I had oodles of sketches and photos of the original sets from the Thief of Bagdad. In order to suggest the scope of the movie, I chose to go very high with construction to give the viewer a feel of the scale of the sets. However, had I made the walls actually to scale, they would have been 6-8' high. Yes, that is crazy---so I had to settle for maximum height of 4' or 24 feet tall in play scale doll feet.
I carved the edges off the front corer of the Pink foam with an Exacto knife and sanded the edges off with another piece of foam. This polishing technique was used throughout the project with the insulation foam, craft foam, and styrofoam.
I also cut two slots for the 1"x 6" wood support boards which would be pegged into the base and the walls. I also trimmed 1" off on two sides of the foam base to make my dimensions less than 24" square. I used 3" pegs cut from dowels to insert in the corners and to secure the bottom to the outside walls.
 |
| barbieoldnewgreenredo |
Foam with cotton sheet applied with one coat of Modge-Podge under an one over. The fabric becomes nearly transparent---letting the printing show on the backside.
The less dense foam insulation was only $14.99 for an entire sheet, it had a plastic cover on one side and a foil cover on the other. Insulation Foam is NOT receptive to spray paints, gorilla glue, E-6000, Super-glues which all eat the plastics in the foam.
So, assembly would have to be with pegs, wire, and stabilized with some of the buildings' constructions. Since the surfaces were not receptive to paint or gesso, I decided to cover them with fabric applied with Modge-Podge, which is an acrylic base and non-toxic also. The fabric I chose was an old cotton sheet. To cover these pieces on both sides and the base, I used one Queen fitted sheet.
 |
| barbieoldnewgreenredo |
I roughly cut the sheet pieces to fit,
 |
| barbieoldnewgreenredo |
Both sides of the large panels and one side of the base were covered in fabric with Modge Podge. I worked from one end to the other, brushing out the wrinkles as I went along while applying a top coat. Upside, the Modg-Podge dries and the fabric shrinks totally smooth. I did have a few bubbles here and there, and chose to ignore them.
It took two days for the surfaces to dry enough to flip over and do the back sides of the walls.
 |
| barbieoldnewgreenredo |
Having no 'color' photos of the original sets, I had to choose a color scheme for the backdrops and base. Golden sand, was logical for the base, and I chose to work with a yellow ochre mixed with white and a bit of black to tone it down. I also added an acrylic sand additive to my paint. This really worked well.
I shop in the Art section of my local Michael's for paint additives and I use Liquitex products bought on half-price sales. The quantities are larger than craft paint--and on sale become very economical and have superior quality and workability. The 'sand' or grit additive worked super, and mixed with acrylic paints created a super tight surface. While still wet, I did a swirling motion with a wide 'cruddy' brush to even out all the texture!
 |
| barbieoldnewgreenredo |
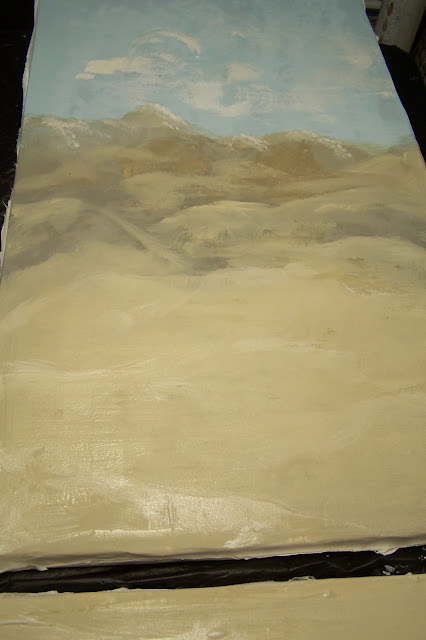
I knew the backsides of the display would be visible, so I painted a loose free hand landscape of desert and mountains with white, blue, ochre, black mixed with a large brush.
Details weren't important, but I echoed the colors that were to be used in the building scenes on the front.
 |
| barbieoldnewgreenredo |
Once the faces of the of the panels were sealed and then painted I could start on the constructions of the city buildings.
 |
| barbieoldnewgreenredo |
On the front side, I loosely painted a sky and some buildings in the background above my sketches for the layout of the buildings. I then concentrated on developing a color scheme that would transfer to black and white as well as look great in living color.
 |
| barbieoldnewgreenredo |
Here is the same photo in black and white as a color test. I was making sure there was enough contrast between the shades of colors. I originally played with color sheets of card stock to develop a color scheme. My plan was to have brighter contrasts in the costumes to show up against a more muted background.
Original inspiration photos take from the internet of the sets for Thief of Bagdad 1924. Some are sketches from the original art director's hand.

source unsure
Actual set photo---those are actors in the lower center to show how large the sets actually were.
 |
| source unsure |
An Original sketch from Menzies the Art Director for "Thief of Bagdad"
 |
| source unsure |
Another of Menzies sketches.
 |
| source unsure |
Actual photo of a Mideast city with the mountains in the background.
 |
| source unsure |
A book illustration of 1000 Arabian Nights. I chose the scheme of golden tones from this, mixed with the grays....used very subtly here.
 |
| TCM |
An actual photo from the film...see how the set dwarfs the extras. I liked the linear elements in this set, with textures, shiny surfaces and the shadows thrown by the architectural elements.
 |
| source unsure |
Another view of the 'city' in outdoor light. The center column is luminous---so I decided to use some metallics.
 |
| TCM |
My problem, what to choose to give the scale of the sets, and still work within my space limits. Which elements do I try to duplicate, imitate or simply suggest?
Part 2-Building a city in 23"x23"! And, how do I make a carpet hang in the air?
If you enjoyed this post(s), please join me by email- at
FOLLOW IT---upper right hand corner.
I have not been paid or reimbursed in anyway for my opinions or products shown, or from where I shop.
Please Join me at these Fine Blog Parties!
Thank you for your cooperation, Sandi
 |
| barbieoldnewgreenredo |
No comments:
Post a Comment
Thanks so much for each and every comment, and I will try and answer any questions you may have.