
Ad-Free Blog
Barbie OLDNEWGREENREDO
 |
| barbieoldnewgreenredo |
Hi, Dear readers. The point of these remodels was to add permanent lighting, add space and eradicate the Mattel color schemes. In other words, make it
as REAL LIFE as possible.
I gave the kitchen appliances two more coats of gray multi-surface acrylic paint, and I added some contact paper counters. I also painted the window frames on the first floor gray over the sprayed beige from the first painting. It took three coats of multi-surface gray acrylic. UGH! Mostly because of all the crevices and my shaky hands.
You can see the temporary walls set in...to give some idea of the new space. I am still pondering adding some floor area to the second floor. The cut for that would be intricate, I will have to see if it warms up enough for Hubby to rough cut that for me outside. Our temps are going very cold again.
 |
| barbieoldnewgreenredo |
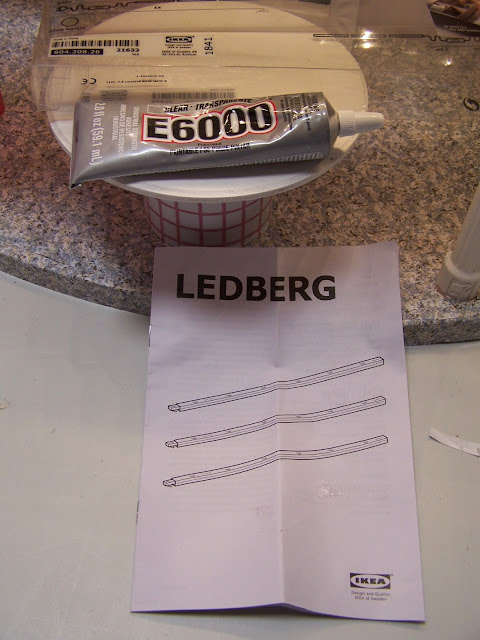
While the house was on the center worktable, I started with the lights. Because of the gridded ceilings, there is no long length to sink lights into. The lighting I chose are LEDBERG bar lighting from IKEA. I had to think about it for a long time, then dug in my my wood scraps.
 |
| barbieoldnewgreenredo |
I buy assorted bags of small wood pieces when I see them on sale and found a few that were the exact width/depth of the grid holes. I cut 6 small length wood bars that would fit inside the ceiling grids. Then I screwed the mounting clips on that come with the light fixture.
 |
| barbieoldnewgreenredo |
The LEDBERG lights are very flexible, you can clip 1, 2 or 3 together in a straight line. The kit includes one cord with switch and one end to plug into the lights. If you want to split the three bars up---you will need to purchase one or more cord(s).
 |
| barbieoldnewgreenredo |
I planned on two bars on the downstairs, and one upstairs with room to add another if I needed to.
 |
| barbieoldnewgreenredo |
The cut wood bars with the clips were then glued (town house laid down on the table) on the ceiling side of the bar and on one side of the grid (walls). I used E6000 which is pretty good on any surface and left it sit for 24 hours.
I had an extra cord left over from doing the Grand Hotel, so I could put the last bar on the second floor.
|
| barbieoldnewgreenredo |
I turned all the lights off in the shop---and tested the lights.
If you are going to do this for kids---nothing is exposed in these plastic bars, and the cords can be encased and totally put behind a house to the wall.
Our grand's house (she got when she was 3) had lights on three floors and were totally encased and cords buried in plastic casings through the back of the house. Switches can also be placed out of reach, but of course it is up to the parent to decide if they want electrical lights in a child's house.
 |
| barbieoldnewgreenredo |
After installation in my totally dark work room.
It looks like this will be more than enough light for the house. YAY!*! I can always add another bar to the second floor if I decide I need it.
No more batteries and no more banging the doll's heads on the Christmas lights. Batteries are great for accent lighting, but for room lighting very expensive to keep going through batteries, and not great for the planet either. These new LED lights use so little power---only 2 watts.
A great REDO and GREEN too!
 |
| barbieoldnewgreenredo |
 |
| barbieoldnewgreenredo |
 |
| barbieoldnewgreenredo |
 |
| barbieoldnewgreenredo |
 |
| barbieoldnewgreenredo |
 |
| barbieoldnewgreenredo |
 |
| barbieoldnewgreenredo |
Your makeovers of remodeling Dollhouses to give them a realistic custom look are stunning... that Kitchen Countertop looks like the Granite Countertop in our Kitchen here! I like the Color Palette you chose. I finally got Christmas put away, that Hallmark Ornament Tree was Labor Intensive to put up and take down, I got The Force involved, kinda tricked them all using reverse psychology. *winks*
ReplyDeleteSo glad to hear from you---I know what you mean, our tree is still up as we are both working on other projects. And, the remodels are work, but then can't do anything else! Thanks for stopping by, Dawn, hugs, Sandi
Delete