BARBIEOLDNEWGREENREDO--JUST A GRANNY HAVING FUN WITH DOLLS< DIORAMAS STORIES AND DIY

BARBIEOLDNEWGREENREDO
Showing posts with label Dollhouse remodel. Show all posts

Story: Builder Manager and Designer Check the Building Site.


Russell the contractor for BMR does a walk-through with Lara Roberts(Manager) and Richele (Project Designer) to see the progress on the Townhouse.


barbieoldnewgreenredo

Richelle: That's a nice size closet for this bedroom.

Russell: The poles should go in tomorrow, we've been waiting on hardware and flooring mostly now.

barbieoldnewgreenredo

Lara: Lots of windows up here, do you have a plan for staging this room for selling?

Richelle: Well, desk for a home office by the closet, mostly just a bed and a comfy chair in that corner. Thought we would do lots of plants in this house with the window walls, flooding all these rooms with light.

Lara: The pink on that elevator has to go. Russell said they are going to box it in with some white panels.

Richelle: Good! I wanted it silver---but dismantling it in winter for spraying isn't an option.

barbieoldnewgreenredo

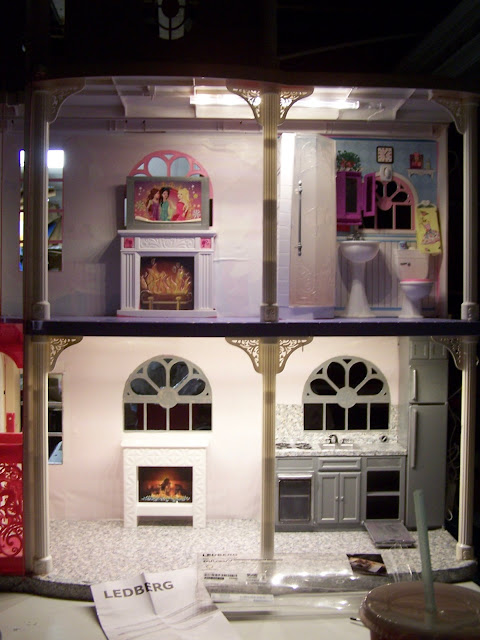
On the second floor the girls check out the new larger floor plan and the bathroom.

barbieoldnewgreenredo

Richelle: We have gray and white tile going in the bathroom. 

barbieoldnewgreenredo

Looks like they have the walls primed.

barbieoldnewgreenredo

Lara: At last the floor is going in...wow, this really makes this room useable.

Richelle: We are hoping to have sliding doors here to block off the sleeping area. 

barbieoldnewgreenredo

Russell: The doors will be sliders or folding---I have both on order, so whatever gets here first.

barbieoldnewgreenredo

Richelle: Oh, I know...I'm waiting on something for every project. We are still waiting on the fire-proof  flooring for the restaurant/bar in the GrandView.

barbieoldnewgreenredo

Lara: Where's the closet on this floor. 

Richelle: Just on your right on that wall. I had a custom cabinet made. The floors will be wide white/gray planking. The doors will go between these two posts. And a wall goes on my left.  

barbieoldnewgreenredo

Richelle: And behind us a seating area by the fireplace and shelves, and another work area? Everyone wants home workspaces now. So I have one planned for every floor.

Lara: Sounds good, let's go down stairs, Russell has the lights on down there now.

barbieoldnewgreenredo

Lara: Wow, this is amazing. The kitchen was always so crowded. 

Richelle: Yes, the addition doubles the space down here, it's a real Great Room now.

Russell: We are pretty much done down here, just some work on the exterior wall and some hardware and trim around the new ceiling.

barbieoldnewgreenredo

Lara: I love all the built-ins. We have to get the photographer over here so I can get something up on the website for a tease. The granite is gorgeous.

barbieoldnewgreenredo

Richelle: We're using the old HFIM house table and I found these benches at a church sale on the west side.  They fit perfect in here. I'm glad I left the table white.

barbieoldnewgreenredo

I have to take photos for staging: plants, books, and maybe some artwork on those shelves.

barbieoldnewgreenredo

Lara: I love that it goes so high up? Really gives the room some scale. Any idea on completion date, Mr. Pittman?

barbieoldnewgreenredo

Russell: If the weather holds and the shipments all show up--we are scheduled to be done end of next week. But I can tell you more by the weekend. More snow is on the way, and we still have some rock work to finish on the outside. 

Lara: Okay...how's the Victorian next door coming along?

Russell: Main floor is done except for some closet doors, and again waiting on plumbing fixtures and a few doors. Everything major is done. But, we could be done by next week, also. 

Lara: It would be great to have both next door properties showing at the same time.
I'll get the photographer lined up for when...Richelle? 

Richelle: I'll get with Trish on the plants and start bringing the final bits over when they are finished. Just a few things to make it look 'livable'.

barbieoldnewgreenredo

Lara: Properties aren't even staging anymore the market is still so hot. I already have five people interested in either one of these houses. 

Richelle: I'd love one of these myself, but they are too big for us right now!

Lara: I may have condo available soon at the Grand View, if you and Ryan are interested. 

Richelle: Oh, wow, maybe---we are camping out in a friends' basement and all our things are in storage. We gave up on finding a place, we kept losing in bidding wars. Rentals are hard to find, too.

barbieoldnewgreenredo


Lara: I'll give you first dibs, it's good sized one bedroom, but definitely not in the basement!

Richelle imagining:  Great and thanks! (I have two blue sofas at the storeroom, I wonder if they will fit? I know the sectional I wanted for here is out of stock, and back ordered...I'll see what works? Might have to wait until they finish that outside wall!)

Russell: Okay ladies, gotta get home before the snow...let's get a move on.
 (Turns out the Lights)

Next: The Victorian Mansion

If you enjoyed this post(s), please join me by email- at 
FOLLOW IT---upper right hand corner.

I have not been paid or reimbursed in anyway for my opinions or products shown, or from where I shop. 


Boxes, Planks, and Paint---oh my!

AD-Free Blog

SUPER EASY, and More ideas for utilizing things you have. I had several of those little boxes that Michael's and now--the $$ Stores sell for so cheap. I had stolen some hinges from some of them, so I have many of these small boxes as well as their lids to use. They are perfect for a wall display and maybe some future drawers?

barbieoldnewgreenredo

I wanted either art or shelves on the one wall in the great room. This wall goes up to the second floor which will be a two story open ceiling over the eating area. Taking some of the wood my Hubby cut for me, I cut in a miter box the shelf pieces to fit the plywood wall piece I had 'stained' with gray paint and water. I wanted the grain to show and also make the foam core (drywall) wall look more permanent.

barbieoldnewgreenredo

On the lower right are the 'benches' found in a thrift store that I'm using for seating under the old HFIM table. 

barbieoldnewgreenredo

The dining area will be adjacent to this wall unit. This is just laid out to see the most desirable design for my space

barbieoldnewgreenredo

I've decided to install everything with double stick foam tape. Sturdy yet flexible and easily removable.

barbieoldnewgreenredo

Here's the wall installed next to the dining area. I decided to add a final shelf to the top.

barbieoldnewgreenredo

After installation with lots of double stick foam tape, I raised the unit to above the bench height. The benches slide right under the table as well as one under the shelves.

barbieoldnewgreenredo

For a very narrow area, this works for dolls moving about the dining area


barbieoldnewgreenredo

Here's the 'bones' of the great room now! Really a huge change. Above you can see the poster board pattern I have made for the second floor extension. 
The weather is warm enough today, for Hubby to go to  the garage and rough cut the new floor. Meanwhile, what will hold it up? 

Next:  I need to decide the walls and supports for the second floor for  this level of the Townhouse Remodel.

Materials needed for this project:

5 small wood boxes with hardware removed (I used only the box backs and not the lids)
wood filler -to fill holes left from removing hinges-and      edges of the wood
sandpaper/sanding block-sand and soften all edges.
acrylic sealer- on all surfaces
acrylic craft paint-white and gray or your choice
3/16" luan plywood, or any thin wood you have. Light-weigh masonite might be too thin. (I used-1 pc. 131/2" x 9" and 5 -2"x8 1/2") pc, but cut wood to your size.
Flexible multi-surface glue, like E-6000
Double stick foam tape ( I use $$ store tape)

Tools needed---
pencil
square measure, (trust me you won't be able to eye-ball      this.)
miter box and a coping or small hack saw
    (Or you could use multi cuts with an Exacto knife-blade through the soft plywood-definitely not for kids)

mini screw driver to remove hardware from boxes
paint brushes
plastic plate or cup for paint (reuseable)
scissors to cut double stick foam tape

For kids: You could also use foam core to make boxes with tape or glue and cover in contact paper to hold their shape.

Pre-cut the pieces needed with an Exacto knife and a metal square, for your kids.  The pieces can be glued together and then covered with contact paper and assembled.

If you enjoyed this post(s), please join me by email- at 
FOLLOW IT---upper right hand corner.

I have not been paid or reimbursed in anyway for my opinions or products shown, or from where I shop. 


DIY Custom Cabinetry for the Townhome Great Room Remodel

 Ad-Free Blog


This past week has been busy with the remodels. I'm calling the first floor in the townhouse, a great room. since it is now a totally open floor plan: with dining, kitchen, family room, and with a study corner being planned.

barbieoldnewgreenredo

Since I want to put a more contemporary spin on the townhome, I had to work in some custom cabinetry to utilize the space efficiently. I used the measurements of the kitchen cabinets and the space I had available...so if you do constructions, make them fit your own spaces.


barbieoldnewgreenredo

The left white wall screams for cabinetry, but since there is a fireplace on the second floor I decided against one on the first floor.

barbieoldnewgreenredo

Hubby cut some 3/8" plywood and masonite strips and pieces for me.  I had lots of small wood pieces of mini-lumber to use for construction braces to square up the 'box' that would be the pantry cabinet next to the kitchen.

barbieoldnewgreenredo

We've designed and put together 3 IKEA kitchens in the last 5 years, I wish mini cabinets were that easy. LOL, anyway. Construction was pretty simple. I did have to 
notch the back top of the cabinets to slide into the house. I did glue and nail the three main cross braces at the top, center and bottom.

barbieoldnewgreenredo

I used an E600 type glue which sets up pretty quickly to hold and then cures in 24 hours. This flexible type glue work pretty well, as you can adjust a bit before it begins to set up. I had so many issues with the small bookshelf---I wasn't real interested in pounding more nails that failed and split the plywood shelves from the side.
So I used glue.

barbieoldnewgreenredo

I glued smaller braces in for the shelves, front and back, and then glued the shelves in also. Trickiest part was the hinges. I stole some extra hinges from some folding picture frames which matched some in my stashes. 

barbieoldnewgreenredo

It's hard to see, but I used an Exacto knife to score around the edges of the hinges on the front door. Then I carefully chiseled out one layer of the wood so the hinge would fit flush into the front door.  The tips of the hinges poke through the door, but are easily filed/sanded off, and will be covered with paint.

barbieoldnewgreenredo

I'm still considering more trim, but decided to finish as is, and if needed later I can always add something.

barbieoldnewgreenredo

I used glue bottles to weight down the shelves overnight to set the whole thing up. I finished the top door the next day!

barbieoldnewgreenredo

I filled/sanded all the edges, and did a paint blitz of the rest of the pieces being used in the room. Two coats of acrylic satin gray paint worked well. I happen to love white insides in cabinets so I did that in the pantry. The open box will be for appliances, either a microwave or a coffee pot? 

barbieoldnewgreenredo

The color difference is the light streaming into the house. It looks like a well-balanced useful kitchen area.

barbieoldnewgreenredo

The box in the middle was was the perfect size as is, so I just painted and added some nice quartz counter top. It's proportions worked so well with the other pieces. The small upright shelf on the left was a nightmare to make---and I will never take closeups of it, LOL. Filled with useful items, this wall will be a great addition for the home and great room.

And now to the Next Custom Project!

If you enjoyed this post(s), please join me by email- at 
FOLLOW IT---upper right hand corner.

I have not been paid or reimbursed in anyway for my opinions or products shown, or from where I shop. 


Odds and Ends: Moving forward in the Mansion Remodel

 Ad-Free Blog

Odds and ends: moving forward in the Mansion Remodel.

Last post we were working on the bathroom, and I was looking through my stuff for something to use for a sink. I have vintage sinks, but they are all too large for the small area. And, I wanted something a bit contemporary, or current at least.

I went through all my minis, bowls, and little cabinets to use for the new bathroom in the Victorian and I found this cabinet.


barbieoldnewgreenredo

This little waffle breakfast cabinet is recent and from Mattel. I had picked it up from a thrift store for $.99. 

barbieoldnewgreenredo

I popped the top off with a screw driver and will be able to use the top and the side extension table for for something else.

barbieoldnewgreenredo

I had a brain fart and went to Crate and Barrel for some little porcelain dipping dishes. There were four styles, all of which would work for sinks. This one is modern and sleek and perfect for a small bathroom for $1.95. I bought two...I'm not going out much and well, you never know when you will drop something.

barbieoldnewgreenredo

I laid out a piece of wood for a counter and checked the space---Perfect!!!

Now, what could I use for a medicine cabinet.
barbieoldnewgreenredo

Remember this wall with the faux cabinet with doors that opened...ta-da- I managed to pry it off, and then I Dremel sawed the pegs off, for some closet space.

barbieoldnewgreenredo

Using the Dremel saw...I rough cut through the softer plastic.

barbieoldnewgreenredo

Not wanting to slice myself, I hand sawed the sides off. 

barbieoldnewgreenredo

Ta-Da! All I needed to do was sand the bottom, ...
barbieoldnewgreenredo


Along with the corners of the wood piece. 


barbieoldnewgreenredo

Other than the Darn PINK this is perfect. Old and New and a Redo...!


barbieoldnewgreenredo

I painted the wood and then shiny contact papered the top and secured the top with double sticky foam from the $$ store. It's not permanent which will allow for future alterations, but will stay secure.  When I find my aluminum pipe I will make the faucet and decide on some creative handles.

barbieoldnewgreenredo

It really does fit well, and has storage, now to temporarily cover that pink cabinet!! And make some shower surround?--back to scrounging in the house, I know I have acrylic and even maybe some channeling??


What projects have you been up to?


If you enjoyed this post(s), please join me by email- at 
FOLLOW IT---upper right hand corner.

I have not been paid or reimbursed in anyway for my opinions or products shown, or from where I shop.