BARBIEOLDNEWGREENREDO--JUST A GRANNY HAVING FUN WITH DOLLS< DIORAMAS STORIES AND DIY

BARBIEOLDNEWGREENREDO
Showing posts with label Barbie Remodel. Show all posts

DIY Custom Cabinetry for the Townhome Great Room Remodel

 Ad-Free Blog


This past week has been busy with the remodels. I'm calling the first floor in the townhouse, a great room. since it is now a totally open floor plan: with dining, kitchen, family room, and with a study corner being planned.

barbieoldnewgreenredo

Since I want to put a more contemporary spin on the townhome, I had to work in some custom cabinetry to utilize the space efficiently. I used the measurements of the kitchen cabinets and the space I had available...so if you do constructions, make them fit your own spaces.

barbieoldnewgreenredo

The left white wall screams for cabinetry, but since there is a fireplace on the second floor I decided against one on the first floor.

barbieoldnewgreenredo

Hubby cut some 3/8" plywood and masonite strips and pieces for me.  I had lots of small wood pieces of mini-lumber to use for construction braces to square up the 'box' that would be the pantry cabinet next to the kitchen.

barbieoldnewgreenredo

We've designed and put together 3 IKEA kitchens in the last 5 years, I wish mini cabinets were that easy. LOL, anyway. Construction was pretty simple. I did have to 
notch the back top of the cabinets to slide into the house. I did glue and nail the three main cross braces at the top, center and bottom.

barbieoldnewgreenredo

I used an E600 type glue which sets up pretty quickly to hold and then cures in 24 hours. This flexible type glue work pretty well, as you can adjust a bit before it begins to set up. I had so many issues with the small bookshelf---I wasn't real interested in pounding more nails that failed and split the plywood shelves from the side.
So I used glue.

barbieoldnewgreenredo

I glued smaller braces in for the shelves, front and back, and then glued the shelves in also. Trickiest part was the hinges. I stole some extra hinges from some folding picture frames which matched some in my stashes. 

barbieoldnewgreenredo

It's hard to see, but I used an Exacto knife to score around the edges of the hinges on the front door. Then I carefully chiseled out one layer of the wood so the hinge would fit flush into the front door.  The tips of the hinges poke through the door, but are easily filed/sanded off, and will be covered with paint.

barbieoldnewgreenredo

I'm still considering more trim, but decided to finish as is, and if needed later I can always add something.

barbieoldnewgreenredo

I used glue bottles to weight down the shelves overnight to set the whole thing up. I finished the top door the next day!

barbieoldnewgreenredo

I filled/sanded all the edges, and did a paint blitz of the rest of the pieces being used in the room. Two coats of acrylic satin gray paint worked well. I happen to love white insides in cabinets so I did that in the pantry. The open box will be for appliances, either a microwave or a coffee pot? 

barbieoldnewgreenredo

The color difference is the light streaming into the house. It looks like a well-balanced useful kitchen area.

barbieoldnewgreenredo

The box in the middle was was the perfect size as is, so I just painted and added some nice quartz counter top. It's proportions worked so well with the other pieces. The small upright shelf on the left was a nightmare to make---and I will never take closeups of it, LOL. Filled with useful items, this wall will be a great addition for the home and great room.

And now to the Next Custom Project!

If you enjoyed this post(s), please join me by email- at 
FOLLOW IT---upper right hand corner.

I have not been paid or reimbursed in anyway for my opinions or products shown, or from where I shop. 


An Empty Townhouse, Planning, Walls, Painting!

AD-FREE BLOG

Yikes, I took everyone and everything out of the  townhouse side of the HFIM House. And pondered, and pondered and pondered.

barbieoldnewgreenredo
The storyline will be---that two houses/remodeled were worth more to the residents/investors. The Chicago market has been hot throughout the pandemic. 
BMR Ltd.  Barbara Millicent Roberts-my no.3's company bought the two  properties and began the separation.

barbieoldnewgreenredo

I picked my nose for two days trying to figure out the new configurations and how to do the 'remodels'! What would new families/residents want in a higher end town house. Meanwhile the craft room was in upheaval.

barbieoldnewgreenredo

I thought I was organized, but my thrift store stashes have gotten out of control. I have 8 totes of furniture, and lots of bits here and there on shelves.

barbieoldnewgreenredo

I pulled out all kinds of furnishings to see what I had that would work in the potentially newly remodeled homes.

barbieoldnewgreenredo

The HFIM guys (7) have moved into the basement apartments for the time being. Belle and Mulan are still living upstairs in the Victorian Mansion. Everyone else is scattered.

barbieoldnewgreenredo

 It really has become fruit basket upset. I couldn't help adding another bunkbed to the 4 girl's duo townhouses to give them two bedrooms(adding a wall) and I 'll eventually add some bathroom walls too, for privacy. Meanwhile there is an extra gal on the sofa. (So that is five gals here).

barbieoldnewgreenredo

One thing was obvious---I have more than enough furnishings to do 10 more dioramas.

barbieoldnewgreenredo

The biggest issue still is...the floors in the townhouse are too shallow for any kind of furniture arrangements. Do I expand the floors out, or just try and work with it as is?

barbieoldnewgreenredo

I decided to definitely add to the ground floor living space, extending the floor about 7" out to match the depth of the Victorian Mansion. This will leave walk space on the open side of all the homes. My imagination says they are all on one crowded block in Chicago, north of the Loop.

barbieoldnewgreenredo

I used an old piece of thick foam core. I actually remembered to notch room for the elevator line.

barbieoldnewgreenredo

The old foam core had (tiles on one side, concrete on the other that gotten raggy.) Thick foam core is running about $7 a sheet now, so I reuse, reuse, reuse.

I ripped off the old papers and had pristine thick foam core.  The thickness wasn't quite enough so I added another layer of $ store foam core on the bottom.

barbieoldnewgreenredo

I also gave the magenta kitchen cabinets a prime coat of brush on multi-surface acrylic after a thorough cleaning with alcohol. OMG..what a difference. I'll finish a second coat tomorrow and silver handles on the appliances, then a sealer. I like the gray---it is neutral and not six layers of white to cover the magenta...LOL!

I ripped off all the wall paper and the pink/white tile flooring(contact paper). I 'drywalled' the walls in white contact paper. It will be easy for new residents to change it to their tastes with wallpapers. (double stick taped papers are easily removable from the contact paper).
There's still a pink tint...I wish I had time to do this in summer so I could spray multi layers of paint. Honestly that ghastly pink is potent!

barbieoldnewgreenredo

Here I have put up some scrap foam core on the sides for the walls, just to see how it will finish off! The center window on the bottom screams for built-ins, which will take some time. First new walls, and deciding on the flooring application. I plan on redoing the elevator---in spring when I can spray it, that will involve restringing it---cross your fingers, I may paper it now, or cover it up...I really don't like that pink!

barbieoldnewgreenredo

I 'drywalled' the second floor room also. The bathroom is fine as it is. I am debating on the flooring or to work with it. There are a few touchups needed here and there of the white!


barbieoldnewgreenredo

The third floor got the same treatment, although the walls on the right were temporary, I finished them off to match. I don't have to add lighting to this floor as it is so close to the ceiling lights in the shop. I plan on painting the windows and adding moldings to the square ones.

PS (Because the walls on the right aren't permanent, I can easily add the original patio/pool and light posts at anytime) Patio pools aren't really cost effective in cold Chicago. Did you ever notice that Barbie apparently lives ONLY in warm climates????)

barbieoldnewgreenredo

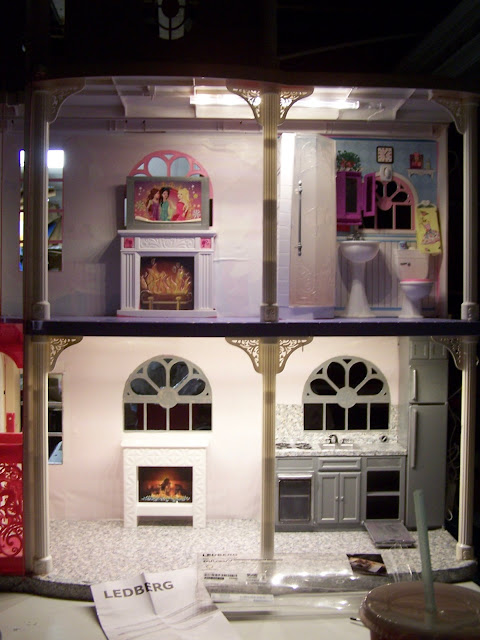
So three days in, this is what I got accomplished. A good start!

barbieoldnewgreenredo

And, here is the IKEA LEDBERG lighting which was the reason I started this to begin with! (No more Batteries!)

Lighting and flooring, more painting in next post!

WHAT'S YOUR LATEST REMODEL PROJECT?

If you enjoyed this post(s), please join me by email- at 
FOLLOW IT---upper right hand corner.

I have not been paid or reimbursed in anyway for my opinions or products shown, or from where I shop. 


HFIM House: Basement Apartment 1

In the walk-out basement of the four-story townhouse/mansion, in the newest-unfinished studio apartment...


Barbie:OldNewGreenRedo

Ryan: Monnie, how do you like our new apartment, lol, hole in the wall, room. (Stares at the hole in the wall temporary window.)

OldNewGreenRedo

Monnie: It's great, but we could still use a closet, but there just isn't any room. But, I now have a space for my drafting table.

Barbie:OldNewGreenRedo

(Barbie drafting table found in a mixed bag of furnishings for $3.99 at a thrift store.)

(I sticky foam topped the table and tools made from sticky felt, foam, plastic office dividers, mechanical pens from bamboo skewers. Tray on right side for mechanical pencils, and left side paper/tool holder from small clear plastic containers, cut.)  see Back to School:supplies

Barbie:OldNewGreenRedo

Ryan: It's been ages since I drew on a board. Why not use a CAD drafting program. 

Barbie:OldNewGreenRedo


Monnie: I do for final 3-dimensional renderings, but when I'm visualizing a space, I like to sketch a bit. It's cool we have a printer down here now, though.  

What do you think about some whitish paneling in here to warm up this little hole, we are a calling our home/office? And getting a new window---soon, before a street person decides to move-in.

Barbie:OldNewGreenRedo


Ryan with mouth full: Shurrr, yea to the paneling, and yes, to the window. I can install it when I'm done eating.

Monnie: Great, I will order the 'paneling' tomorrow. We can squeak it out of the budget, since we sent back all that wood flooring, and this red table has to go---it's too big for in here. Maybe, Nemo could build a nice wall unit, with a drop down table? 

Ryan: Nemo has football from now on. He's JV defensive coach and assistant for the varsity this year. I haven't seen him all week. 

A wall unit would be great and make this HFIM house sellable, if we ever get everything done. Maybe the new guys, Danny or Aidan would have time. We have to keep everyone busy and we need another meeting, soon with everyone, if that's possible, maybe Saturday morning?
Oh, and the doors are being delivered on Wednesday.

Monnie: I don't think we ever knew how complicated this idea would be of rehabbing these properties together and living in them while we do it. But, then you and I wouldn't have had to work so closely together. 

How about, (she jumps up on the bed) we try this new bed out?


Barbie:OldNewGreenRedo

Ryan: Well there is the window, 

Barbie:OldNewGreenRedo

and my stuff to put away? 

Monnie: Don't you think we have put this off long enough, Ryan?

Barbie:OldNewGreenRedo


Ryan: (Jumps up and rushes to the corner and grabs the still boxed window.)

I want you to myself and not for a performance street show. Darling, just hold that thought! 

 *TO BE CONTINUED*


Thank you for visiting,
Barbie:Old New Green Redo.
 I will be happy to answer any mail or questions or comments. 

Sharing at these fine parties:

All the opinions and photographs on this blog are my own, unless otherwise stated. 
 I have not been paid or reimbursed in anyway for my opinion,
 or with products shown, or from where I shop. 
PLEASE do not use photos without linking back to this blog 
without my permission. 
Thank you for your cooperation, Sandi Magle

Sandi